
Technology lessons for educational technology integration in the classroom. Content for teachers and students.
Enhanced Dice App Lesson 5
In this fifth lesson, we are going to add to our exiting animation. The dice are currently rotating. Dice are often thrown in the real world. I want to simulate what the dice might look like if they are thrown and are flying toward the stage.

Enhanced Dice App Lesson 5 of 5
In this fifth lesson, we are going to add to our exiting animation. The dice are currently rotating. Dice are often thrown in the real world. I want to simulate what the dice might look like if they are thrown and are flying toward the stage. In this animation, the dice will begin as smaller versions. This is intended to simulate that they are being thrown from a distance. The dice will gradually get larger until they come to rest at their original size.
Changing the dice size from small to large creates perspective. It creates a sense of motion. The dice will reduce in size when the button is pressed. The dice will increase in size as they roll and go through each loop. We need some math to help us do this.
The math is easy. The size of the sprites is set to 75 percent. The loop is set to iterate 10 times. We are going to create variables that will render the correct animation regardless of the values. The animation will work even if we change the number of iterations or the size of the dice.
Select the "Die1" sprite. Go to the Looks section and place the "change size by" code on the canvas. Don't attach it to the main code yet. We want to change the size of the image by a percentage. We need to calculate this percentage and place it in a variable. The code will receive the percentage from the variable.
Go to the variables section. Create a variable. Set the variable name to "Dice 1 size".

Place the variable into the "change size by…" parameter.

Place the code at the beginning of the main code string. The code is at the beginning because we want the sprite to resize before other effects are applied.

Select the "Die2" sprite. Place the "change size by" code at the beginning. Create another variable. Set the variable name to "Dice 2 size". Add the variable to the size parameter.

Select the "rollButton" sprite. Place the set code block from the variables section onto the canvas. Don't attach it to the main code yet. Change the set option to "Dice 1 size".

Place the divisor operator into the set parameter.

It is always a good idea to create variables to pass values into parameters. Create two variables. Set one of the variable names to "diceSize" and the other to "diceTurns". Place the "diceSize" variable into the numerator parameter. Place the "diceTurns" into the denominator parameter.

I chose these variable names to make it easier to understand what is going on here. Read the code block like a sentence. Set the dice 1 size to the dice size divided by the dice turns. Place this code at the beginning of the repeat loop.

Place another set code block in the loop. Place the code below the other set code. Change the set to "Dice to size". Add the operator to divide the dice size by the dice turns.

We need to set the values for our variables before running the program. This is called initializing the variables. Place two set variable code blocks before the repeat loop. Set the dice size to 75-percent. Set the dice turns to 10.

The repeat parameter in the loop needs to get its value from the variable we created. Place the "diceTurns" variable in the repeats parameter.

We are getting closer to the finish. The dice will spin and change size each time through the loop. The size depends on the denominator. The denominator needs to get smaller each time. This is so the size of the sprite gets larger each time. An easy way to look at this is to look at a table with the values from each pass in the loop.
In the table below we see that the initial image size is divided by 10. The size becomes 7.5 percent of the original size. The second time through the loop, the size is divided by 9. The size is now 8.3 percent. Each time through the loop the size gets a little larger as the denominator gets smaller. I think this a great way to show the relationship between denominators and numerators.

To change the size we need to change the "diceTurns" value. The loop has an internal counter. We need to create and use a counter of our own. Place a change code block from the variables section before the end of the loop. Change the variable to "diceTurns". The parameter is set to change the variable by 1. This will add one to the current "diceTurns" value. We want to decrease the value. Change the positive one to a negative one.

The code for our button is done. We need to update one code block in our sprites for this to work properly.

Go to sprite "Die1". Pull away the code at "start sound".

Remove the "change size by" code. Replace it with "set size to". Reconnect the code.

Place the "Dice 1 size" variable in the "set size to" parameter.

At the end of the loop, we will have an image of the dice that is the same as when we started. It is still good practice to set the initial size of our object at the beginning. Place a set size code block onto the reset code. Change the parameter to 75 percent. I entered a number into this variable. Is this the proper way to do this?

If you said no, then you are right. We need to use a variable in place of the 75 percent we entered. Replace the value 75 with the variable Dice 1 size.
Repeat the process with the "Die2" sprite. Make sure to use the "Dice 2 size" variable. Click the Roll button to run the app. The sprites will reduce in size at the beginning. They will get larger as they go through the loop. They will return to their original size at the end of the loop. If something doesn't go well then you need to go back and check the code. Review the images in my instructions.

There are information boxes on the stage along with the sprites. The information boxes show the values in the variables. Use this information to help troubleshoot any bugs in the app. Remove the information boxes when the app is working fine. To remove the boxes you need to remove the checkmark from each variable.

The link to my dice app is available below. Make a copy and use it to build on for your app.
Enhanced Dice App Lesson 4
This is the fourth lesson in a five-part lesson project. In this lesson, we will add some visual effects to the animation. There are some effects for images that distort and colorize sprites. You will learn how to apply any of the effects to the sprite to add some visual appeal.

Enhanced Dice App Lesson 4 of 5
Visual effects
This is the fourth lesson in a five-part lesson project. In this lesson, we will add some visual effects to the animation. There are some effects for images that distort and colorize sprites. You will learn how to apply any of the effects to the sprite to add some visual appeal.
Anything that affects the appearance of a sprite needs to be added to the sprite. Select the “Die1” sprite. Go to the Looks section. Place a “set effect…to…” code block at the end of the code. The block parameter is set to change the color of the sprite. The effect value is set to zero. A value of zero will not add any effect.
Click the effects selector. Select the fisheye effect.

Change the effect to 20. The number represents a percentage. There is nothing magical about this number. I chose it because I wanted to get a hint of what the effect would produce on the image. Click the Roll button. Observe what happens to the image.
We applied the effect to one sprite for now. Once we settle on an effect it will be applied to the other sprite. I like this effect because it is subtle. Chose an effect for your Sprite.

Before applying the effect to the other sprite we need to reset the effect for the next roll. Keeping the effect after the dice finishes rolling doesn’t look correct. Place the “clear graphic effects” code under the reset code. Add the same effect code to the other sprite.

Return to the “rollButton” sprite. We need to call the reset message at the end of the animation. The reset is currently applied to the beginning. The images need to be reset after the animation and effects is complete. Place another broadcast reset code after the loop. Click the Roll button.
Our app is finished for now. I hope you learned several things to make your app more interesting to use. Before we finish I want to include one more step. I want to add more animation. I want to simulate dice flying into view. To do this we need to use some math and a little animation. That will be the topic of the next lesson.
Enhanced Dice App Lesson 2
In this lesson, we continue from last week's lesson. Last week we organized our code in preparation for a larger project. We are moving over to the sprites and adding basic animation.
Enhanced Dice App Lesson 2 of 5
Dice animation
In this lesson, we continue from last week's lesson. Last week we organized our code in preparation for a larger project. We are moving over to our sprites and adding basic animation. The dice will spin and change face values as they spin. We will return to the button code and include a variable to set the rotation angle.
Click on the "Die1" sprite. Go to the Motion section. Attach the turn clockwise code block to our code. Repeat the process with the "Die2" sprite. Choose the counterclockwise code.
Click the Roll button to test the code. The dice images spin. This works fine but they land at awkward angles. The dice rotate fifteen degrees during each loop. They go through the loop ten times. The dice rotate a total of 150 degrees. For the dice to land flat they need to land at a 90-degree angle. We can choose multiples of 90-degree angles. The possible angles include 90, 180, 270, and 360. If we leave the number of loops set to ten, we can set the angle of each rotation to 9, 18, 27, or 36. We can try each of these to find one that we think works well.
The values in our turns are manually entered into each dice sprite. This isn't efficient or convenient. We need to create a variable that will pass a value to each turn without having to constantly go and change the value in each sprite. Go to the variables section. Create a new variable. Name the variable rotation.

Place the rotation variable into the "Die1" and "Die2" sprites code.

Go to the "rollButton" sprite. Place the set variable block in the loop below the last code. Change the variable to "rotation".

Set the rotation parameter to 18. This will rotate the dice and they should land flat after rotating 180 degrees. Click the Roll button.

The dice spin but they still land at the same awkward angle. The code is working fine. They are at this angle from the previous code we used. We need to make sure to reset the rotation of the blocks before running the program. This is part of what we do with all programs. We set the default values.
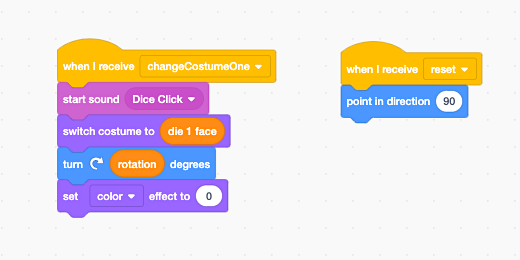
Properties for sprites need to be associated with each sprite. To reset each dice sprite we need to insert reset instructions into each. Click the "Die1" sprite. Place a "when I receive…" code on the stage. This code is in the Events section. The code is not attached to our existing code. It stands on its own.

Click the message selector and create a new message. Set the message name to "reset". Select this message in the message received event.

Attach a "point in direction…" code block to the reset message received. The "point in direction" code is in the Motion section. The direction is set to 90-degrees. Click on the "Die2" sprite and repeat the process. You don't have to create a separate variable for the message. Use the same variable.

Go to the "rollButton" sprite. Place a broadcast code block before the repeat code. Change the message to reset. Click the Roll button. The dice will spin and display a random face value. The dice will land at a 90-degree angle.

That’s it for lesson two. In the next lesson we will add sound to the dice app.
Enhanced Dice App Lesson 1
In this lesson, we are adding a button to trigger the animation. We are also organizing the code to develop a more sophisticated app. Our Code should always be as simple as it can be.

Enhanced Dice App Lesson 1 of 5
Button code
In this lesson, we are adding a button to trigger the animation. We are also organizing the code to develop a more sophisticated app. Our Code should always be as simple as it can be. This reduces the number of errors possible and makes debugging our code much easier. The more complex the app the more we need to keep our code simple and organized. That is part of what we will do here.
We are going to build on our existing code. We are going to make a copy of the app. This allows us to keep the original and build on the existing code and graphics. Go over to scratch at https://scratch.mit.edu. Log into your account. Click the folder icon to access your projects.

Find the app you created. Click the “See inside” button to open the app in edit mode.

Click File and select the option to save a copy.

If you didn’t create the first app, I encourage you to return and create the app. It will help you understand what we will do here. You can jump right into this lesson by making a copy of my app. Use the link below to get a copy. Update the file name for the copy. Replace the word copy with number 2.

https://scratch.mit.edu/projects/341906863
The loop
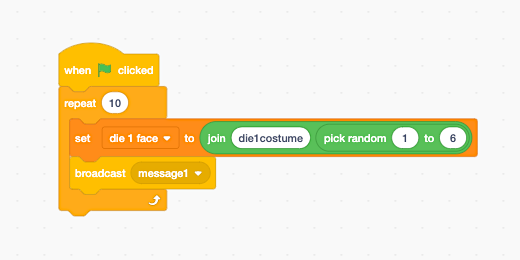
The dice faces change when we click the flag button. A random number is generated and the dice faces change to the corresponding number. To animate the dice we place our code into a loop. The loop will run the random number generator and change the dice face a specific number of times. Pull away the first code block from the flag event.

Go to the Control section and find the repeat code block. The repeat block is commonly referred to as a loop. I will refer to is as a loop too.

Drag the repeat code block toward the top of the first code block. Look for a shadow of the repeat block to appear around the code. Release the code block.

The loop will repeat the code we created. The loop has one parameter. The parameter is used to tell the loop how many times to repeat the instructions. The parameter is automatically set to 10. We will use this value.

Attach the repeat block to the flag event. Click the flag event. The set code is calling the dice sprite on the left. The die will change face values ten times. The faces change fast. It’s almost difficult to see. The one on the right will run once. The code we are modifying is associated with the left dice sprite only.

There is an acronym in programming, DRY. Don’t Repeat Yourself or don’t repeat patterns. Our code is a pattern of instructions. If we were to repeat the instructions for the dice on the right we would be repeating a pattern. We repeated the code in our first app. The app is simple so repetition isn’t anything to worry about. In larger programs, we need to reduce or eliminate repletion. The goal of programming is to make things easier and simple. Repeating a process or pattern is complex and inefficient. Repeating patterns makes it difficult to fix mistakes or find errors.
App button
To avoid repetition we will assign the code to one sprite. We will create a separate sprite to send instructions to the dice faces. This sprite will be a button. We will create this button right inside Scratch. Go to the Sprite section. Click the add Sprite button. Select the brush icon.
A paint application opens. Click the rectangle tool.

Draw a rectangle in the drawing canvas.

Click the shape fill selector. Move the sliders to change the button color. Chose a color you like. Choose a dark color.

Click the text tool.

Click once on the drawing canvas to insert a text box. The text box does not need to be inside the rectangle we just drew. Type the word ROLL.

Select the text in the text box. Click the color fill option in the button bar.

Move the saturation slider to the left. This will remove the color from the text. The text will be white. White contrasts well with our button color. Contrasting colors are easier to read on a screen.

Move the text box and center it inside the rectangle.

Use the corner handles to resize the text box.

Position the resized text box in the center of the rectangle.

The sprite button we created appears on the stage with the dice sprites.
Move the images on the stage. Position the button and dice images so the dice images are above the button. Center the button below the dice sprites.
Coping code to other sprites
Click the Code tab to return to the coding canvas.

Select the “Die1” sprite.
We are going to copy our existing code blocks and attach them to the button. Click the flag event code block and drag the code blocks to the sprites section. Drag the code over the button sprite and release.

The code blocks will snap back to the canvas. It doesn’t look like it, but we just copied the code to the button sprite. Click the button sprite to see the code blocks. If you don’t see the code blocks in the button sprite then try copying them again.
Return to the “Die1” sprite. We don’t need the code attached to this sprite. Click and drag the code blocks out of the canvas and into the code blocks panel. Click the “Die2” sprite and remove the code blocks. Return to the button sprite.

Go to the sprite name field. Change the name of the sprite to “rollButton”. We combined two words without spaces. This is a common way to create names and variables. This format is known as Camel Case. It is called Camel Case because the shape of the lower and upper case letters resembles the shape of a camel. Each capital letter is like the hump on a camel. We don’t include spaces to avoid errors when typing the name.
Calling events on sprites
The code block will cycle through the die costumes ten times. The costumes on the die won’t change until we send a message to the die sprite to change costume. Go to the Events section. Look for the broadcast code block. Place it below the set code block in the loop. This code sends a generic message to any code block that is listening. It is better to have a message name that describes what the message wants or does. Remove the switch to costume code.
Click the broadcast message selector. Click the New Message option.

Type “changeCostumeOne” in the message name field. Click the OK button.

These two code blocks will change the face for the first dice. We need to repeat the process for the second dice. Right-click on the set code block. Select the Duplicate option.

The duplicate code attaches itself to the pointer. Attach the code to the bottom of the existing code.

Change the duplicate set code block parameters. Change “die 1 face” to “die 2 face”. Change “die1costume” to “die2costume”.

Click the broadcast selector from the duplicate broadcast code. Create a new message.

Title the new message “changeCostumeTwo”.

Our basic loop code is setup.

Dice sprite listeners
We need to add listeners to each dice sprite. Click on “Die1” sprite. The “Die1” sprite canvas should be blank. Go to the Events section. Place the “When I receive…” code on the canvas. This code listens for a message.
Click the message selector and choose “changeCostumeOne”.

Go to the Looks section. Place the “switch costume to …” code below the message code. The costume selector lists all the sprite costumes. We need to change to the costume selected by the random number generator. The costume information is stored in the “die 1 face” variable.

Go to the variables section. Place the “die 1 face” variable into the costume selector parameter.

Click on the “Die2” sprite. Follow the same steps. Add the message code to the canvas. Listen to the “changeCostumeTwo” message. Attach the switch code to the message code. Use the “die 2 face” variable for the costume parameter.
Button sprite event
Go to the button sprite. The code in the sprite has the flag button event code at the beginning. The purpose of a button is to have someone press the button instead of the flag. Drag the repeat code away from the flag event.

Remove the flag event by dragging it to the code panel. Go to the Events section. Place the “when this sprite clicked” code on the canvas and attach it to the repeat code. Click the button sprite on the stage. The dice faces will change as they receive messages from the button sprite code.

Now that our code is organized it’s time to animate our dice. That is in the next lesson.
Dice App Graphics
In last week’s lesson, Creating a Dice Game with Scratch, we created a dice app in Scratch. In that lesson, I provided the dice images for the app. I thought it would be a good idea to show you how I created those images. I am using a free online illustration app.
Introduction
In last week’s lesson, Creating a Dice Game with Scratch, we created a dice app in Scratch. In that lesson, I provided the dice images for the app. I thought it would be a good idea to show you how I created those images. I am using a free online illustration app. The app is available at https://vectr.com.
The app doesn’t require an account to use. This is good news if your students don’t have Google accounts or are below the age of thirteen. If students do have a Google account then I encourage them to use it. Creating an account allows us to save our project online. Go over to https://vectr.com/login and create your free account. Click the Sign-up button to create an account with one of these services. You can use a different email if you don’t have Facebook, Twitter, or Google.
Dice project Graphics
We need a file to create and store our project. Click the Create File button.

A drawing canvas is opened for our project. There are several tools available to make our project. We will explore some of them while creating the project. Go over to the right side of the canvas. There are five icons. The first three are grouped. Click the center button on the three that are grouped.

The box below the button is where we provide a name for the project. Change the current name of untitled to “Dice Face Images”.

A button appears once we provide a name. Click the button to save the project with the new file name. Leave the other options alone. Make sure the measurement is set to Pixels.

Click on the first button on the left. This opens snapping and grid options.

Select the grid option.

A grid appears on the canvas. This gird will help us in the design of our project.

There is a Shape bar on the left side of the canvas. Look for the ellipse shape. Click the shape to select it. We are beginning the design with the dice circles.

Click and drag a circle shape on the canvas. You will notice that the shape is either a circle or an ellipse. It all depends on how you are dragging the arrow as you draw it out. There is a trick to keep the shape in the form of a circle. Press and hold the shift key with our other hand while dragging the circle.

Your circle should look something like this. Don’t worry if it doesn’t match exactly. We will take care of this later. It’s also okay if the shape isn’t an exact circle. We will take care of this too. The color of your shape is different each time. Don’t worry about the color for now.
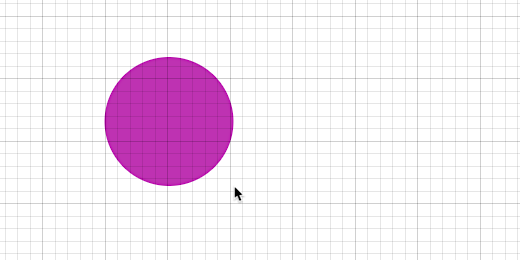
Release the shape. Make sure it is still selected.

There is a properties box on the lower right side of the canvas. The box contains information about the width and height of the shape. The width and height of my shape are close but not exact.

There is an icon between the width and height measurements. It looks like a chain link. The measurements are linked to each other. Click the icon to break the link.

The link icon will disappear. Change the size for the width and height. Change each measurement to 100px.
The image on our canvas is now a nice circle.

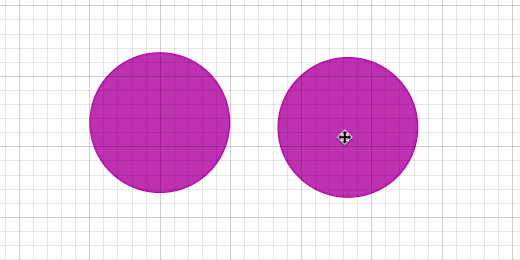
We need more circles for our dice faces. We will make a copy of this shape. Right-click on the shape. Select the duplicate option.

A duplicate appears and overlaps our original shape. Click and drag the shape to one side of the original.

Lines appear around the shape as we move it on the canvas. These are guides. They help us align the object on the canvas. Move the circle so it is parallel to the other.
We want to use the guides to make sure the shapes are parallel to each other. Click and drag the original shape until you see guides appear all around the shape. These guides are aligned with the major grid lines. Major grid lines are darker. Minor gridlines are between major grid lines. Release the shape.

Move the other shape. Use the guides to place the shape within the major grid lines. Make sure the shapes are parallel.

We want to space the shapes so they are even across the dice face. Drag the second shape so that the guides fall on major gridlines. Space them so there is one major square between them.

Right-click and duplicate the second circle.

Place the third circle in line with the other two. Space it so there is a major square space between them. These three circles will create the dice face that represents the number six.

Duplicate each circle and place it below each of the three circles. Leave one major square between them. Use the guides to help align the shapes.

Each set of circles represents the numbers on the dice faces. We need a shape to represent the dice itself. Go to the shape bar and select the rounded rectangle shape.

Draw a small rectangle shape above the left circle. Before drawing the full shape we need to know what size to make the shape.

To figure this out we need to look at the size of the circle shapes. Each circle shape is 100 pixels in diameter. There are three circles across so we have 300 pixels in circles. There is a space between each circle. This space is one major square.
Look closer at the circle. The diameter takes up two of these squares. If two squares are 100 pixels then each square is 50 pixels. There are two spaces between each circle. This adds another 100 pixels. We are now up to 400 pixels. We will begin with this value.
Make sure the rounded rectangle is still selected. Go to the properties box. Make sure the link icon is not showing. Change the width to 400px. Leave the height alone for now.

Click and drag the rounded rectangle shape so it is above the circles and centered. Use the guides to help you align the shape. The shape matches the circles from left to right.
This doesn’t leave any space to the left or right. A dice has space on either side of the dots. We need to add some space. We will add 50 pixels on either side. This the spacing consistent.

Go to the property box and change the width of the rounded rectangle to 500px.
Return to the shape on the canvas and move it so the center matches the center of the circles.

Return to the properties for the rectangle. Change the height to 500px.
The rounded rectangle is done but it covers the circles.

Each shape is placed on a layer. Each layer is like a piece of transparent paper. The layers are listed in the layers panel on the left. The rounded rectangle is at the topmost layer. The rectangle layer needs to be placed below the ellipse layers.

Click and drag the layer below the last ellipse layer. A purple line shows where the layer will be placed.

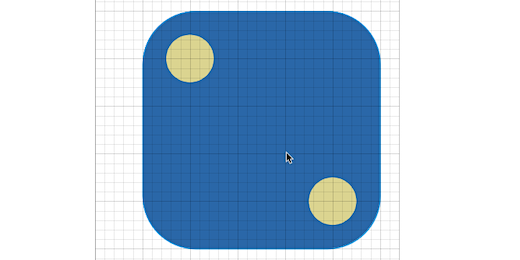
All the circles are visible. We need to space the bottom three circles. We want them closer to the bottom of the rounded rectangle.

Click and drag one of the circles. Place it so the spacing from the edge matches the circles on top. The circle needs to be 50px from the bottom edge. Use the guides to align it with the circle above.

Repeat the process with the other circles.

Colors
Let’s change the colors of our dice face. Click on the rectangle shape. Every shape has a background and border color. The background color for my shape is light blue. Click the color to open the color picker.

Move the color slider on the right to one of your favorite colors. The gradient on the left is used to select the shade for the color. For example, move the slider toward blue. The shape background color changes to match.

Move the dot in the gradient to make the color darker or lighter. Move the slider and the dot to find a color you like for the dice background.

Change the color of the circles using the same method. Click on a circle and choose a contrasting color. For example, if you chose a dark color for the dice background you should choose a light color for the dice circles. I chose a light yellow for my circle.
We need to use this color for the other circles. The color picker keeps track of the colors we use. The colors are represented by a code. The code is shown in the box below the color selector. The color code begins with the “#” symbol.

Click on another circle. We want the circle to be filled with the same color. Click the background color button. Click the eyedropper tool next to the color code box.
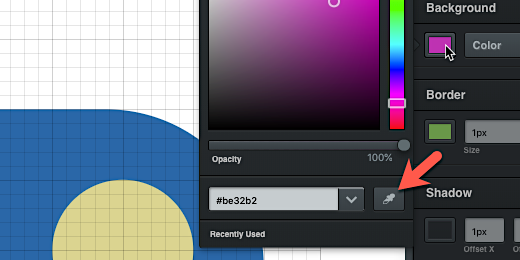
The arrow for the mouse is replaced with a color picker. Move the color picker over the color of the previous circle. Click to select the color.

The color of the circle changes to the color you selected. Repeat the process with the remaining circles. Remember to select the circle that needs a color first. Choose the color you want with the color picker.

You are finished with the first face of our dice image set. The creation of the rest of the images is much easier.

Adding pages
Each image is constructed from shape layers. The image layers are part of a page. Our first dice image is on one page. Click pages to switch to the pages section.

We are going to use our first image as the basis for the remaining images. This will save time. Click the duplicate icon. The icon is below the image page preview.

The page is duplicated and selected for us. A light border appears around selected pages.

Go tot he image for this page and click the top center circle. Press the delete key on your keyboard to remove the circle from the image. You can also right-click the shape and select delete.

Select the center circle on the bottom and drag it up toward the center.

Use the guides to help you align the circle.

We have our face for the number five dice face.

Click the duplicate button for the second page.

Click the center circle and press the delete key on your keyboard. We now have the dice face for the number four. Duplicate this page.

Delete one of the corner circles. Move the other circle to the center of the shape. We now have the face for the number three. Duplicate the page.

Remove the center circle. Duplicate the page.
Remove one of the corner circles. Move the remaining circle to the center.

Downloading the images
We are done with all the dice face images. The next step is to download the images. The images will be uploaded to your own Scratch Dice App. We need to download each image separately. The last image is currently selected. This image represents the number one.
Return to the panel on the right side of the canvas. Click the export button.

The image appears in a preview area. The grid background has disappeared. The grid is not saved as part of the image.

The preview configuration panel has several options. We are exporting the selected page. The image is set to be exported using the SVG, Scalable Vector Graphic format. The size of the shape is 640 by 640 pixels. There is a link to this image by we won’t be using that here. There is a download and print button.

The image is set to be exported as an SVG. This is a very good format to use. This format is hard for other programs to use. I like to change the format to one that is more universal. Click the image format selector and choose PNG, Portable Network Graphics. This format is popular when we want to include transparent areas in our image. In this case, the transparent area would be the background.

Just so we can see the difference. Click the image format selector again and choose jpg, Joint Photographic Experts Group. This format does not support transparency. This is why we see the white canvas area around the image. Return to the PNG format.

Click the download button. The image is downloaded immediately. Click the “X” button to close the export options.

Click the page above the image we just exported. Repeat the process to export this image. Make sure the image format is set to PNG and click the download button. Repeat the process for the rest of the pages and images. Each image file is named Dice Face Image followed by a number. Except for the first image. You can rename the images or upload them to your Scratch project with this name. I recommend renaming the images.
Dice Game with Scratch
In this lesson, we are creating a dice game. The purpose of the game is to teach two concepts. Dice games are considered a form of random number generator. This random number generator is useful when teaching basic concepts in probability. The second concept is of course coding.

Introduction
Coding is one of those essential skills needed by students today. Much like we needed to have typing skills in the past. Coding languages have evolved over the years to provide us with code which resembles English sentences. This makes it much easier for most to learn to code.
In this lesson, we are creating a dice game. The purpose of the game is to teach two concepts. Dice games are considered a form of random number generator. This random number generator is useful when teaching basic concepts in probability. The second concept is of course coding. We will spend the majoring of our time coding.
You will learn how to create this game using Scratch. Scratch is a free online development platform. It uses blocks instead of typed lines of code. Blocks are useful for those new to coding. Code blocks are like a basic sentence. We change parts of the sentence to change the meaning of the sentence. For example, John ran to the store is a sentence. To change its meaning we substitute nouns and verbs. John walks to the market. We can also say Matthew skips and hops to the store.
You will create variables to store values. Variables are like letters in an algebraic equation. Variables are also like the nouns and verbs we change in a sentence.
You will use a random number code block to generate the numbers for our dice game. A Sprite will display our dice images. Sprites are what we call graphics in Scratch. You will learn how to use Sprite costumes to represent each dice image. We will use the random number generated and costumes to display the appropriate dice image.
I created the Sprite and costumes for our program. Use the resources button to download the graphics.
This project is inspired by a coding project taught by the App Brewery. They use this project to teach Swift coding fundamentals. Swift is a language used to develop apps for iOS devices like iPhone, iPad, and Mac.
Scratch accounts
Anyone can use scratch to create products. You don't need an account to create a product. You do need an account to save your product. The requirement for creating an account is that you be thirteen years of age or older.
Most school districts create and manage accounts for students. These accounts are typically through services like Microsoft and Google. Scratch currently supports Google account integration. If your students don’t have Google accounts then you will need to get a teacher account through scratch.
Go to https://scratch.mit.edu/educators and scroll to the bottom of the page. You will find a button to apply for an educator account. The process takes a few minutes. You can create and manage student accounts through this educator account. If you aren’t sure how to do this, please read my issue on
Scratch Coding for Storytelling. It walks you through the process.
Dice Game
Log into Scratch and click the create button.

Title the project Dice Game.

Code is Scratch assigned to Sprites. The Scratch Cat is a Sprite. It is included with every new project. Sprites appear on the stage area to the right of the coding canvas.
We won’t create our dice Sprites yet. Let’s understand the fundamentals of our code first. When coding we want to try out our ideas to see how they work before diving into the full project.
Here are some math concepts. Each Die has six sides. In math, we call each side a Face. A Die has six faces. The corners of the Die are called Vertices. One corner is called a Vertex. The lines that connect the corners are called Edges. A Die is a cube.

How many Edges and Vertices does a Die have? It has 8 vertices and 12 edges.
Each face in our die has dots that represent numeric values. The dots begin with one and go all the way up to six. We need to generate a number from one to six.
Math code blocks are found in the Operators section. Click on the Operators section and find the code block to pick a random number. This code block is an oval shape. The block has two circles. Each has a number inside. The block as it appears will select a number between one and ten.

Click and drag this code block onto the coding canvas. This code block doesn’t do much on its own. We need to combine it with another code.

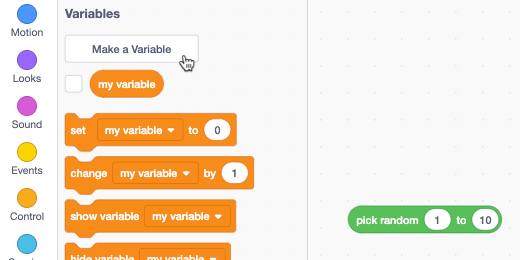
We want to display the selected random number. To do this we will create a variable. The variable will hold the selected random number. Select the Variables category.
Click the “Make a variable” button.
We are prompted to enter a name for the variable. Names for variables should be descriptive. They should describe what the variable will hold.

The name of the variable is “selected random number”. Click the OK button.

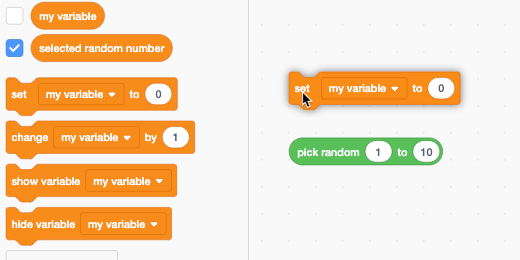
The variable is created and selected. The variable is available for us to use with other code blocks in the variable category.

Place the “set ’my variable’ to 0” block on the canvas.
Click the “my variable” selector and choose the variable we created.

The variable is set to receive the number zero. This is the value of the parameter. What we want is the value of the random number to be assigned to the variable.

Drag the “pick random 1 to 10” code block over the parameter for our variable. Notice how the shapes match. The oval for the parameter will highlight when the block is ready to be accepted. Release the block when the parameter highlights.

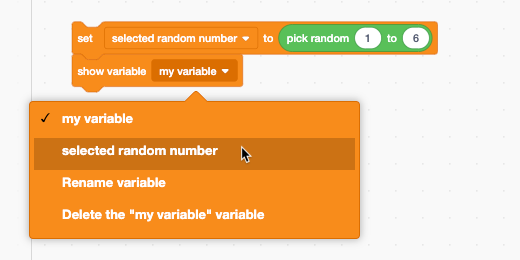
Change the random number picker value from 10 to 6. Our variable will receive one of six random numbers generated by the random number generator. Once the number is generated we need to display the results.

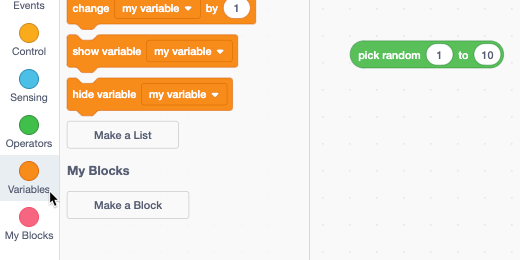
Drag the “show variable” code and attach it to the bottom.

Click the “my variable” sector and choose our variable.
Our basic code is almost ready. We need something to start the program running. We need an event.

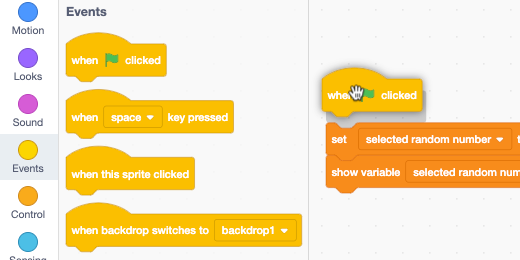
Go to the Events category. Drag the “When ‘Flag’ clicked” code onto the canvas and attach it to the top of our first line of code.
Let’s read the code like a sentence. When the flag is clicked, set the variable, selected random number, to a random number. Show me the random number assigned to the variable. Do you see how the code fits into a standard English sentence?
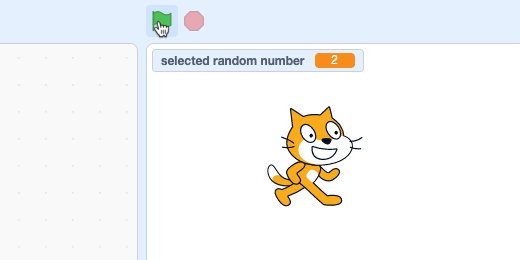
Let’s get the code running. Look at the stage. The stage has the Scratch cat Sprite. There is a block at the top of the stage. This block shows our selected random number. It is placed there when we create a variable. Above the stage is a flag icon. This is the button we press to run the code.

ready to run our code
Click the flag to generate and display a random number between one and six. Click the flag a few more times. A random number will display each time. Sometimes the same number might appear again. This is what happens with random numbers. Random numbers repeat sometimes.
This is the essence of what our program does to generate and display a random number from one to six. The next step is to use the same code to display the face of a die. At this point, we need to create a sprite of our own. Make sure you have downloaded the image file from the link. Here is the link again. Make sure to decompress the zip file.
Creating a sprite
Move your mouse over the add sprite icon. A list of icons will open. Select the option to “Upload Sprite”.
There are six images in the Dice image folder. Select the image that represents the number one. Click the Open button.

A sprite is created with the image and selected.
Go over to where the code blocks are located and click the Costumes tab.

Our sprite has one costume.
Click the add costume button and select the option to upload a costume.
Go to the dice image folder and select the remaining images.
The images are added to our sprite as costumes. We need to arrange them so they are in order from one to six.
Click and drag the images to place them in order.
The costume name and image don’t match. We need to change the name of each costume. We plan to use a pair of dice. To that end, we need to name each costume with a name that describes the costume. Click on the first costume and erase the number that represents the costume name.
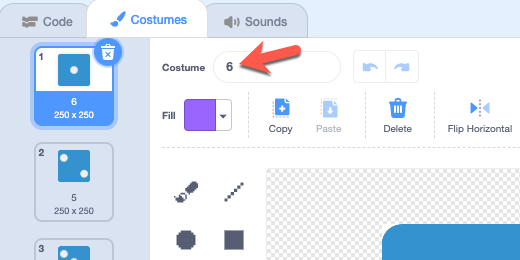
Name the first face “die1costume1”. Name the next costume “die1costume2”. Name the next costume “die1costume3”. Repeat the process for the rest of the sprite costumes.
Return to the Code section.

Click once on the sprite we created to place it on the stage. We have two sprites on the stage. We don’t need the cat any more.

Click on the Scratch sprite. Click the trash can icon to remove this sprite.
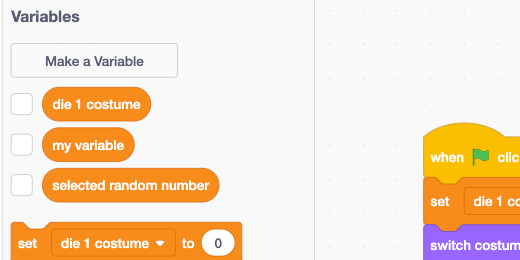
Go to the variables section and create a variable. Call the variable “die 1 costume”.

When we deleted the Scratch sprite we also deleted the code that was attached to the sprite. That’s okay because we know what to do now. Place the set code onto the canvas. Make sure that the “die 1 costume” is selected for the variable.
Each costume has a near-identical name. The only difference is the number for the costume. We will use this number to select the costume to display. The number will come from our random number generator. We are going to join the name of the die costume with the number generated. There is a block in the Operators section that helps us do this.
Find the join code and place it in the parameter field.

Replace the word apple with “die1costume”. Don’t include a number for the costume. This number will come from the number generator.

Place the random number generator code onto the parameter that currently has the word banana in it. Change the value from 10 to 6.

Go to the Looks section. Find the “switch costume to” code.

Attach the code to the bottom of our current code.

Go to the variables section and get the “die 1 costume” variable.

Place the variable onto the existing switch costume parameter. This replaces the variable with our own.

Go to the Events section and place the “when flag clicked” event at the beginning of the code.

Click the flag button to change the die face on the stage. Look at the die 1 costume information block. The costume number matches the face of the die shown on the stage. We don’t need these information blocks on the stage. Go to the variables section to hide them.

Remove the checkmark next to each variable.
We have one die in place. Our next task is to repeat this process with another die. The first thing we need to do is rename the sprite. Click on the sprite and change the name in the name field. Name the die “Die1”.
We are going to duplicate this sprite to save us some time. Right-click on the sprite and select duplicate.
The sprite is duplicated and named Die2 for us. This is convenient.
Make sure the new sprite is selected and click the Costumes tab. We are going to change the names of each costume. Changing the names will allow us to display the face of each separately. We only need to change the number for the die. Change the name of “die1costume1” to “die2costume1”. Change the name of the second costume to “die2costume2”. Repeat this process for the other costume names.
Click the Code tab to return to the code libraries. Go to the variables section. Create a new variable. Title the variable "die 2 costume".
We need to set the die 2 costume with a code block. Place the set die 1 costume code below the last code on our canvas. My code block reads die 1 costume. Your parameter might read something else. Click the variable selector and select "die 2 costume".

Go to the operator section. Get the join code and insert it into the parameter for the set code.

Type “die2costume” in the first join parameter.

Place the random number generator in the second join parameter. Change the number from 10 to 6.

Go to the looks section. Place the “switch costume to…” code below the last code block.
Go to the variables section and place the die 2 costume variable in the costume selector.

Our program is done. Click the flag to see the dice change face values. The die is very large. We will fix this in a moment. We need to fix some redundancy in our code first. The code we just finished is attached to the Die2 sprite. Click the Die1 sprite. The code attached to this sprite is the first part of the code that relates to this sprite. Click back onto the Die2 sprite.
We should remove redundant code whenever possible. We don’t need to repeat the code for die1 in die2. Click and drag away the last two code blocks. Leave them on the canvas.
Detach the two code blocks below the event code. Drag them over to the code library panel and release. This will remove them from the coding canvas.
Attach the remaining code on the canvas to the event.
Rearrange the dice
Go to the sprite section and click on the Die1 sprite. The sprite size is set to 100 percent of the image size. Change the size to 75 percent.
The sprite will resize on the stage. Click on the Die2 sprite. Change it to 75 percent.
Click and drag the die sprites on the stage to place them side by side.
Press the event flag a few times to see the faces on the dice change.
The names we used, “die 1 costume” and “die 2 costume” were created to understand what would be going on in our code. In terms of using this for math instruction, it would be better to use “die 1 face” and die 2 face”.
To to the variables section. Right-click on the “die 1 costume” variable. Select “Rename variable”.

Rename the die to “die 1 face” and click the OK button. Repeat the process with the other variable.

That brings us to the conclusion of this project. In part two of this project, I will show you how to create the dice images. The finished project is available below.