Enhanced Dice App Lesson 1

Enhanced Dice App Lesson 1 of 5
Button code
In this lesson, we are adding a button to trigger the animation. We are also organizing the code to develop a more sophisticated app. Our Code should always be as simple as it can be. This reduces the number of errors possible and makes debugging our code much easier. The more complex the app the more we need to keep our code simple and organized. That is part of what we will do here.
We are going to build on our existing code. We are going to make a copy of the app. This allows us to keep the original and build on the existing code and graphics. Go over to scratch at https://scratch.mit.edu. Log into your account. Click the folder icon to access your projects.

Find the app you created. Click the “See inside” button to open the app in edit mode.

Click File and select the option to save a copy.

If you didn’t create the first app, I encourage you to return and create the app. It will help you understand what we will do here. You can jump right into this lesson by making a copy of my app. Use the link below to get a copy. Update the file name for the copy. Replace the word copy with number 2.

https://scratch.mit.edu/projects/341906863
The loop
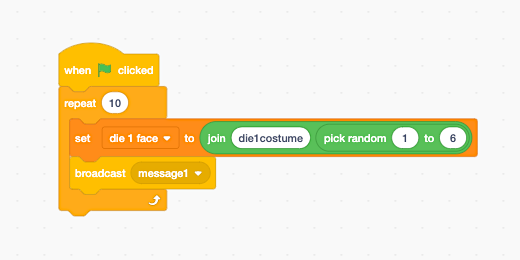
The dice faces change when we click the flag button. A random number is generated and the dice faces change to the corresponding number. To animate the dice we place our code into a loop. The loop will run the random number generator and change the dice face a specific number of times. Pull away the first code block from the flag event.

Go to the Control section and find the repeat code block. The repeat block is commonly referred to as a loop. I will refer to is as a loop too.

Drag the repeat code block toward the top of the first code block. Look for a shadow of the repeat block to appear around the code. Release the code block.

The loop will repeat the code we created. The loop has one parameter. The parameter is used to tell the loop how many times to repeat the instructions. The parameter is automatically set to 10. We will use this value.

Attach the repeat block to the flag event. Click the flag event. The set code is calling the dice sprite on the left. The die will change face values ten times. The faces change fast. It’s almost difficult to see. The one on the right will run once. The code we are modifying is associated with the left dice sprite only.

There is an acronym in programming, DRY. Don’t Repeat Yourself or don’t repeat patterns. Our code is a pattern of instructions. If we were to repeat the instructions for the dice on the right we would be repeating a pattern. We repeated the code in our first app. The app is simple so repetition isn’t anything to worry about. In larger programs, we need to reduce or eliminate repletion. The goal of programming is to make things easier and simple. Repeating a process or pattern is complex and inefficient. Repeating patterns makes it difficult to fix mistakes or find errors.
App button
To avoid repetition we will assign the code to one sprite. We will create a separate sprite to send instructions to the dice faces. This sprite will be a button. We will create this button right inside Scratch. Go to the Sprite section. Click the add Sprite button. Select the brush icon.
A paint application opens. Click the rectangle tool.

Draw a rectangle in the drawing canvas.

Click the shape fill selector. Move the sliders to change the button color. Chose a color you like. Choose a dark color.

Click the text tool.

Click once on the drawing canvas to insert a text box. The text box does not need to be inside the rectangle we just drew. Type the word ROLL.

Select the text in the text box. Click the color fill option in the button bar.

Move the saturation slider to the left. This will remove the color from the text. The text will be white. White contrasts well with our button color. Contrasting colors are easier to read on a screen.

Move the text box and center it inside the rectangle.

Use the corner handles to resize the text box.

Position the resized text box in the center of the rectangle.

The sprite button we created appears on the stage with the dice sprites.
Move the images on the stage. Position the button and dice images so the dice images are above the button. Center the button below the dice sprites.
Coping code to other sprites
Click the Code tab to return to the coding canvas.

Select the “Die1” sprite.
We are going to copy our existing code blocks and attach them to the button. Click the flag event code block and drag the code blocks to the sprites section. Drag the code over the button sprite and release.

The code blocks will snap back to the canvas. It doesn’t look like it, but we just copied the code to the button sprite. Click the button sprite to see the code blocks. If you don’t see the code blocks in the button sprite then try copying them again.
Return to the “Die1” sprite. We don’t need the code attached to this sprite. Click and drag the code blocks out of the canvas and into the code blocks panel. Click the “Die2” sprite and remove the code blocks. Return to the button sprite.

Go to the sprite name field. Change the name of the sprite to “rollButton”. We combined two words without spaces. This is a common way to create names and variables. This format is known as Camel Case. It is called Camel Case because the shape of the lower and upper case letters resembles the shape of a camel. Each capital letter is like the hump on a camel. We don’t include spaces to avoid errors when typing the name.
Calling events on sprites
The code block will cycle through the die costumes ten times. The costumes on the die won’t change until we send a message to the die sprite to change costume. Go to the Events section. Look for the broadcast code block. Place it below the set code block in the loop. This code sends a generic message to any code block that is listening. It is better to have a message name that describes what the message wants or does. Remove the switch to costume code.
Click the broadcast message selector. Click the New Message option.

Type “changeCostumeOne” in the message name field. Click the OK button.

These two code blocks will change the face for the first dice. We need to repeat the process for the second dice. Right-click on the set code block. Select the Duplicate option.

The duplicate code attaches itself to the pointer. Attach the code to the bottom of the existing code.

Change the duplicate set code block parameters. Change “die 1 face” to “die 2 face”. Change “die1costume” to “die2costume”.

Click the broadcast selector from the duplicate broadcast code. Create a new message.

Title the new message “changeCostumeTwo”.

Our basic loop code is setup.

Dice sprite listeners
We need to add listeners to each dice sprite. Click on “Die1” sprite. The “Die1” sprite canvas should be blank. Go to the Events section. Place the “When I receive…” code on the canvas. This code listens for a message.
Click the message selector and choose “changeCostumeOne”.

Go to the Looks section. Place the “switch costume to …” code below the message code. The costume selector lists all the sprite costumes. We need to change to the costume selected by the random number generator. The costume information is stored in the “die 1 face” variable.

Go to the variables section. Place the “die 1 face” variable into the costume selector parameter.

Click on the “Die2” sprite. Follow the same steps. Add the message code to the canvas. Listen to the “changeCostumeTwo” message. Attach the switch code to the message code. Use the “die 2 face” variable for the costume parameter.
Button sprite event
Go to the button sprite. The code in the sprite has the flag button event code at the beginning. The purpose of a button is to have someone press the button instead of the flag. Drag the repeat code away from the flag event.

Remove the flag event by dragging it to the code panel. Go to the Events section. Place the “when this sprite clicked” code on the canvas and attach it to the repeat code. Click the button sprite on the stage. The dice faces will change as they receive messages from the button sprite code.

Now that our code is organized it’s time to animate our dice. That is in the next lesson.