Multiple character dialogue with Scratch

Multiple character dialogue
Introduction
This lesson expands on a previous lesson. The link to that lesson is below. In that lesson, we used a list to provide the dialogue for the Sprites. I want to explore the options for using lists with multiple characters and dialogue between those characters.
This lesson is much longer than I expected. There were so many things I wanted to include that I thought the instruction would suffer if I removed parts of the lesson to make it shorter. The aim is to provide the instruction in the context of an overall project. I don’t care for teaching content in isolation.
The lesson is a mix of scene transitions, animation, and dialogue. This is done to preserve the context of the project.
The project develops naturally like a programmer developing a product. Programming is a series of iterations toward the development of a completed product.
Use the link below to view the completed project. Use the completed project to compare your code if something doesn’t work.
Final multi-character dialogue project
I have a base Scratch project available to begin the lesson. This project was developed in earlier lessons. Use the link below to access those lessons.
Interactive presentation with Scratch
Interactive stories with lists
Use the link below to get a copy of the base project for this lesson.
https://scratch.mit.edu/projects/480221619/
The base project has an actor and a background scene. The code in the project generates some dialogue between the actor and the audience. The actor interacts with the audience and is prompted to respond to questions. The actor, in turn, responds to the input from the audience.
Click the Green Flag button to go through the program.
Transitioning actors
The background remains the same in the project. The actor’s transition in and out of the scene. This keeps things simple and follows the theme of the project.
The actor is in the position where we want him to communicate with the audience. The diver will not begin here when the program starts. He will move into position from above the aquarium window.

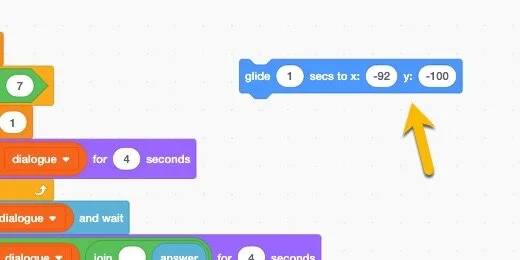
Go to the Motion section; find the [Glide to x:… Y:…] code block.

Place the code block on the canvas next to the main code. The code contains the current position of the Sprite.
Go to the stage and move the diver to the top. Move it as far as you can.
You will not be able to remove the sprite from the stage. Sprites must be attached to the stage; there will always be some part of the sprite on the stage.

We can force the sprite to move off the stage as far as possible.; go to the Sprite settings section. Click inside the “y-coordinate” field.

Type 400 and press the Return key.

Scratch places the sprite at the maximum allowable edge for the sprite. Each sprite has its maximum. The maximum is based on the size and shape of the sprite. It is also based on the sprite’s center.

There is still some part of the sprite visible. We will take care of this later with some code.

Go back to the Motion section; find the [go to x:… y:…] code block.

Place the code block on the canvas. Don’t connect the blocks yet.

This isn’t the only sprite to place in position. Each actor needs to be reset at the beginning of the program.
Disconnect the base code from the Green Flag.

As the code gets longer, it makes sense to divide the code into manageable chunks. I used a similar process in the lesson where the actor communicated in several languages. That lesson is available using the link below.
We are going to use the Broadcast code blocks.
Multiple language dialogue Scratch projects
Go to the Events section; look for the [broadcast message] block.

Attach the block to the Green Flag.

Click the message selector and choose New Message.

Title the message “Reset actor positions” then click the OK button.

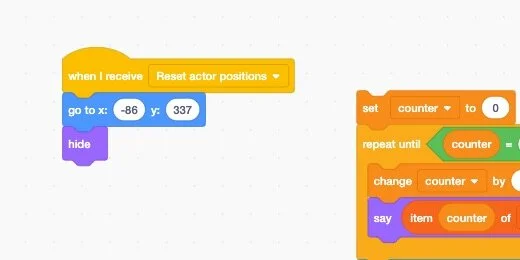
Place a [When I receive message] code Hat on the canvas.

Choose the [Reset actor position] message.

Get the [go to] code block on the canvas and connect it to the [When I receive message] block.

Go to the Looks section. Get the [Hide] code block and connect it to the [go to] block.
Go to the Control section; place a [wait 1 second] code after the [Broadcast] code.

Go to the Events section; connect a [Broadcast] block after the [Wait] code. Create a new message.

Set the name of the message to “Welcome message”.

Place a [When I receive message] Hat on the canvas then select the Welcome message.

Connect a [Show] block from the Looks section to the message Hat.
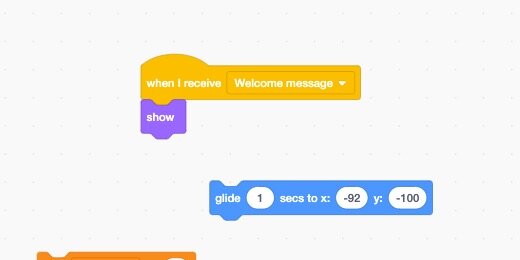
Connect the [Glide] code to the [Show] block. Change the Glide time to 5-seconds.

Connect the blocks to the main code.

This is what. is going on so far. When the green flag is clicked, a message is sent to the Reset blocks. The sprite is placed outside the stage area and hidden. One second later, the welcome message is sent. The code connected to the Welcome message Hat block is executed.
Click the green flag to run through the program.

More actors
We need more actors in the presentation. Use the link below to download a Zip folder. Extract the contents of the folder. Inside you will find three Sprites.

Return to the Scratch project. Choose Upload from the Add Sprite options.

Select all the Sprites in the folder then click the Open button.

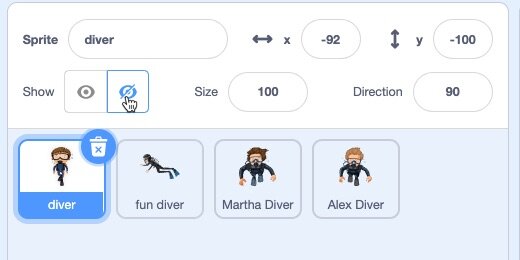
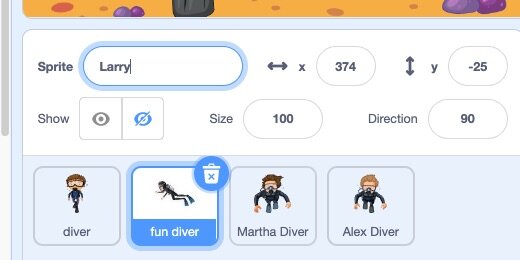
Select the Fun Diver sprite then click the Hide button.

Select the Martha Diver sprite and hide it too.

Go ahead and hide the Diver sprite too. Leave the Alex Diver visible.
Select the Alex Diver and set the x and y coordinates to -124 and -45.

Place a [Glide…seconds to x:…y:…] block on the canvas.

Change the “y-coordinate” value to 400.

Place a [go to x:…y:…] block on the canvas. Don’t connect it to the other block yet.

Connect a [Hide] block to the end of the [Go to] block. Place the [Glide] block alongside the [Go to] block.

Connect a [When I receive message] Hat block to the [Go to] block. Select the “Reset actor positions” message.
This uses the existing message to pass a message to this sprite.

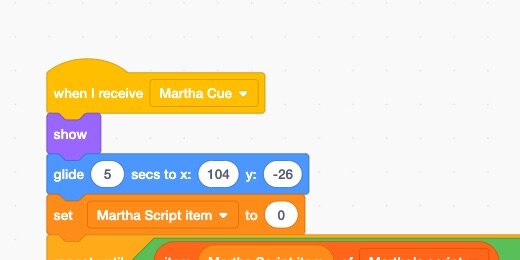
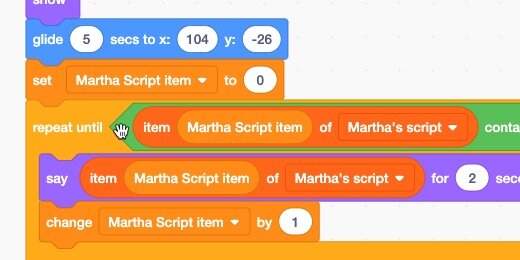
Select the Martha Diver sprite then click the Show button. Place the sprite at the coordinates 104 and -26.

Go to the Motion section. Place a [Glide…seconds to x:…y:…] block on the canvas.

Enter 400 for the y-coordinate and press the Return key.

Place a [Go to x:…y…] code block next to the Glide block.

Connect a [Hide] block to the end of the [Go to] block. Connect a [When I receive message] block to the beginning.

The code for the actors to clear the stage is complete. We will use the same code for new actors in the future.
The script
The actors need a script to follow. The scripts can be created with any word processor. I use Google Docs to develop the scripts for each diver. Use the link below to get a copy of Alex Diver’s script.
Alex Diver’s script Google Document
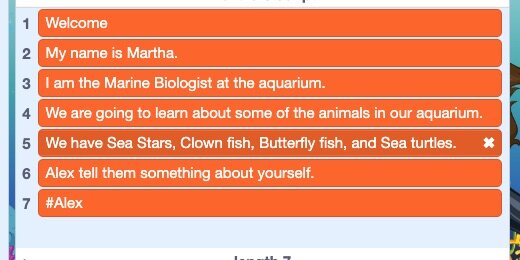
The script has five lines of introductory text. Each line represents a separate sentence displayed by the character. The sixth line is a Cue Marker. This is something I came up with to Cue the next actor. The cue begins with a hashtag followed by the actor’s name. You will see how this works in the code later. We will return to add more content to the text later.
Creating a script for Scratch is simple. There is one rule that you need to follow. Don’t use commas. A comma is a delimiter. Delimiters are separators for columns of information in a CSV, Comma Separated Value, file. The Scratch list is one column so it cannot import something that might have two or more columns. We will add commas where needed after the text is imported.
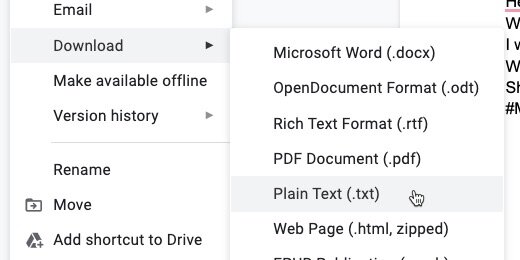
The document needs to be exported as a Plain Text file for import into a Scratch list.

Click File in the menu then go to the download option and select the Palin Text option.
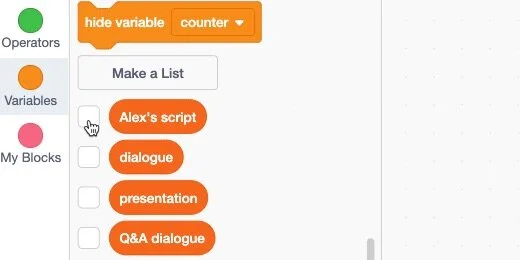
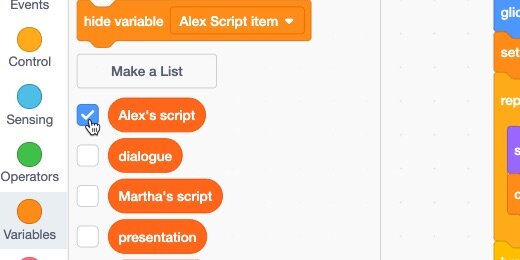
Return to the Scratch project tab. Go to the Variables section and click the Make a List button.
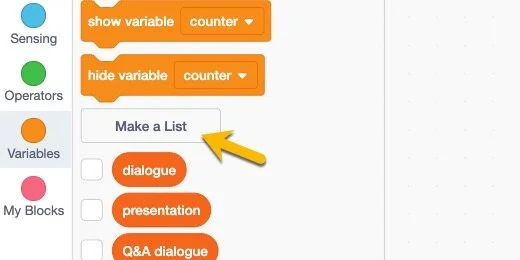
Set the list name to “Alex’s script” and click the OK button.

The list is created and placed on the stage.

Right-click on the list and select Import.

Find the plain text file and open it.

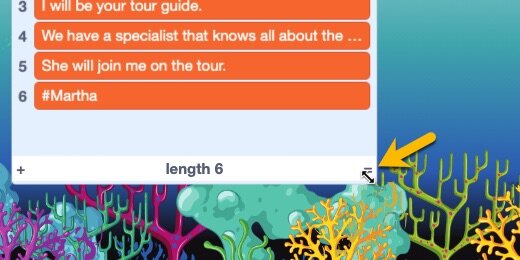
The contents of the text file are loaded into the list. Each line is a separate item.

Drag the lower right corner to resize the list width.
Click inside the first item. Add a comma after the word Hello.

Go to the Variables section and click the “Make a Variable” button. The variable will keep track of the lines read by the actors.

Use “Script item” for the variable name.

Place a “Script item” variable on the canvas. Place a [Set variable and a Change variable] block on the canvas. Don’t connect the blocks to anything. We are placing the blocks here to reduce the number of trips to this section.

blocks on canvas
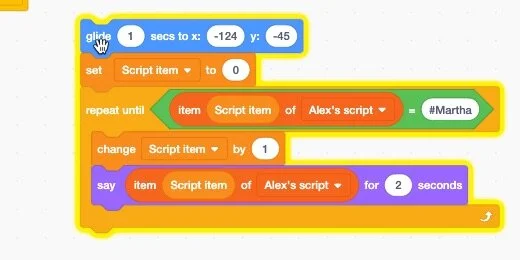
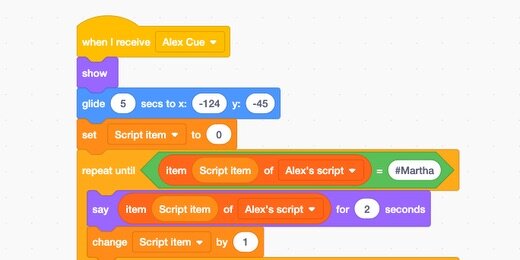
Connect the [Set variable] to the Glide code. Use the Variable selector to choose the “Script item” variable.

We want the program to cycle through each line in the script until it reaches the next actor’s Cue.
Go to the Control section. Get a [Repeat Until] loop and connect it to the [Set variable] code.

Go to the Operators section. Place an [Equality] operator into the loop parameter.
An Equality operator checks to see if the value on the left matches the value on the right. It does not assign one value to the other.

Go to the Variables section; scroll to the List code blocks. Find the [Item…of List] code block.

Place the code into the left side of the [Equality] operator.

Make sure the list is set to “Alex’s script”.

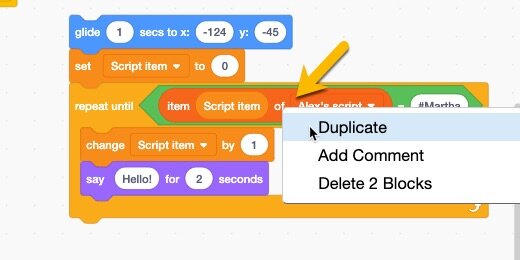
Right-click the [Script item] variable then select the Duplicate option.

Place the variable into the [List item] parameter.

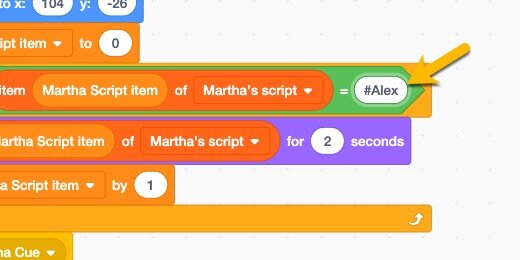
Type “#Martha” into the right side of the [Equality] parameter.

Let’s take a break to review what is going on up to this point. The loop will go through each item in the list, Alex’s script, until it finds the item “#Martha”.
Add the [Change variable] code to the loop. Select the “Script item” variable.

Go to the Looks section. Get a [Say…for…seconds] block and place it in the loop. Place it after the [Change] code.

Right-click the [Item…of List] code block and select Duplicate.
Place the code into the [Say] parameter.

Go to the Variables section and remove the checkmark from “Alex’s script”.
Click the first line of this code to test it.
The actor on the stage goes through the lines in the list. We left the variable display on the stage to see each script item number as it is displayed.
Displaying the variable on the stage is one way to make sure everything is going well. It is also a method to find bugs in your code.

At the end of the loop, we see the cue for Martha appear in the dialogue box. This cue should not appear.
Let’s take a look at what is going on. The loop begins with zero and one is added to the variable at the beginning. The first line of dialogue is executed. On the next iteration, it is incremented by 1 and the second line of the dialogue is read.
When we get to the fifth line, the loop returns and adds one more; line 6 is read. It has to be read because the loop has not finished yet.
To prevent the reading of the sixth line, we need to increment the variable after the line is read. For example, the variable is incremented by 1 after the fifth line to get 6. This is the end of the loop and the line is not read at the beginning of the loop.
I dove a little deeper into this concept because students often have a difficult time understanding this process. We walk through the process in class. I think it is an excellent way for students to understand some process and sequencing skills.
Get the Say block and place it at the beginning of the loop.
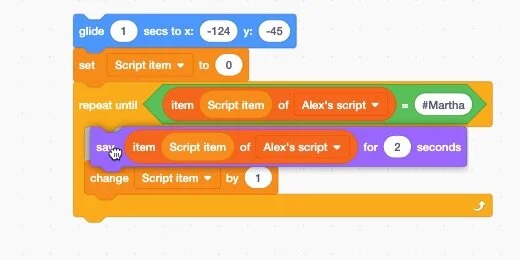
Run the lines of code again. The Martha cue is not executed.
Add a Show block to the beginning of the code.

We don’t need the variable to display on the scene. Go to the Variables section and remove the checkmark from the variable.

checkmark removed
Transition actors
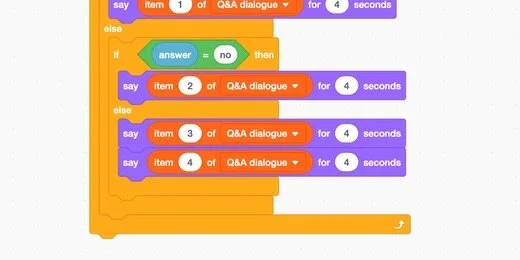
We have one of the divers ready to appear when a visitor wants a tour. We need to transition the first diver out of the scene. The first diver will exit the scene if the visitor responds yes or no. The second diver appears only if a visitor responds with a yes.
Select the first diver sprite.

Click the green flag to start the program. Wait until the diver stops moving down and click the Stop button.

The diver’s exit is taken care of with two blocks of code. Those blocks of code will be in a separate function.
Go to the My Blocks section; click the Make a Block button.

Set the name of the block to “Diver exit” and click the OK button.

Place the Hat block with the other blocks. Keep things organized.

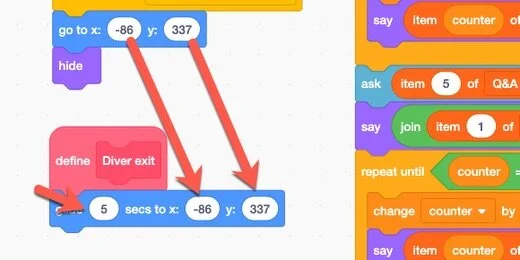
The diver needs to float to the top of the stage. Connect a [glide 1 secs to x:…y:…] code block.

The destination coordinates need to be updated. The coordinates point to the diver’s current position on the stage. The destination coordinates are in the Reset function. The coordinates are -86 and 337. Enter these coordinates into the Glide x and y parameters. Change the glide time to 5-seconds.
Connect a [Hide] block to the Glide code. This part of the code is complete.

Move the coding canvas to display the bottom of the main code.
Go to the My Blocks section. There is only one block in the section. This block calls the Hat block. It is like using the Message function.

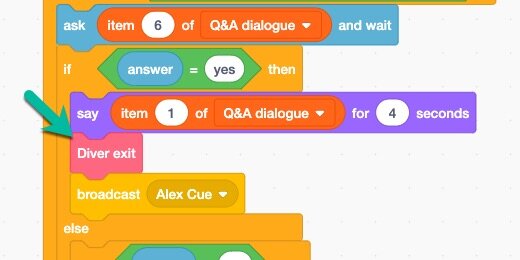
Place a [Diver exit] block after the [Say] block in the If section for when the guest answers Yes.
Place a [Driver exit] block after the [Say] block in the If section where the guest answers No.

Return to the Yes portion of the condition statement. Place a [Broadcast message] block after the [Diver exit] block and create a new message variable.

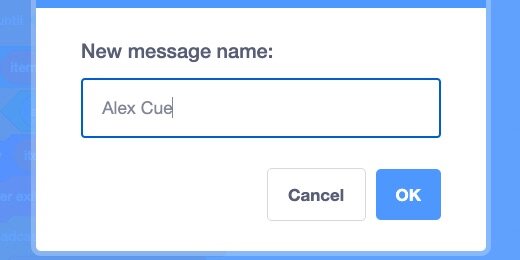
Set the message name variable to “Alex Cue”.
When the guest enters Yes, the Alex Diver sprite is cued.

Select the Alex Diver sprite.

Place the [When I receive message] Hat at the top of the code. Make sure the Alex cue message is selected.

Test the code
Click the green flag and run through the program. Answer Yes to watch the Alex Diver sprite appear on stage.
The Alex Diver sprite is gliding too fast; change the glide time to 5-seconds.

Cue Martha Diver
It’s time for Martha to make an appearance. Place a Broadcast block after the loop. Create a new message. Set the name to “Martha Cue”.
Select the Martha sprite. This sprite needs code for the conversation. The code is the same as that used for the Alex Diver sprite.

Select the Alex Diver sprite. We are going to copy the code to the Martha Diver sprite.
Grab the first code block and drag it to the Sprites section. Drag the code over the Martha Diver sprite and release.

Switch to the Martha Diver sprite.

The code is probably covering the other code. Move the code around so they are all visible.

We need to update the parameters in this code. The sprite needs to glide into a different position. Get the glide coordinates from the glide code we captured in the beginning. Enter them into the main glide code parameters.

We don’t need the glide code block anymore. Drag it to the codes section.

This sprite code is using the same variable counter used in the Alex Diver sprite. This sprite needs a separate variable to keep track of its list items.

Go to the variables section. Right-click the Script item variable and select Rename variable.

Add Alex to the beginning of the variable name and click OK.

Click the Make a Variable button.

Use “Martha Script item” for the variable name.

Use the variable selector to change the variable to Martha’s script item.

Repeat the process for all the variable selectors used in the Martha Diver sprite.

We need to replace the Alex Script item variable with the Martha Script item. Drag the Martha Script item variable over the Alex Script item variable.
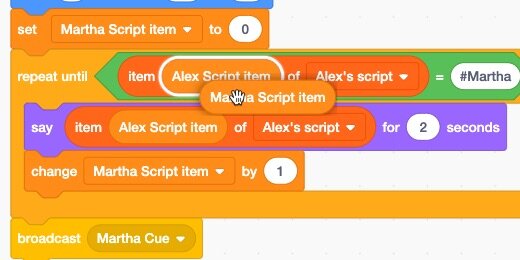
Repeat the process for the other variable. Remove the Alex Script item variables from the canvas. They might be hiding under the code.

Martha Diver Script
The code is referencing Alex’s script. Martha has her script. Use the link below to get a copy of the Google Doc with the script. The text includes a cue at the end for the Alex Diver sprite. The sentences do NOT contain COMMAS. We will add those later. Download the document as a Plain Text file.

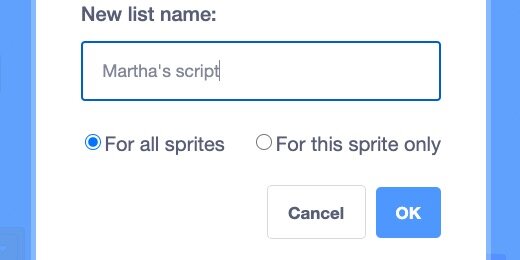
Go to the Variables section and click the Make a List button.

Use “Martha’s script” for the name.
Right-click the list name and select the import option. Find the plain text file and open it.

Expand the list and place commas in item five.
Remove the checkmark from the list name.

Use the list selector in the loop parameter to select Martha’s script.

Repeat the process for the other list parameters.

Change the #Martha cue to #Alex.
Change the Broadcast cue to Alex cue.

Change the message Hat Alex cue to Martha cue.

Click the green flag and run through the program.
The program will go through Alex’s script and then through Martha’s script. Martha will broadcast to the Alex sprite at the end. Stop the program.
Continuing the conversation
Let’s update the script to continue the conversation. Open the Alex Diver script Google document.
Add your text to the script. I have some text here for you to use if you would rather use mine.
Thank you Martha
I am an Oceanographer.
I study marine life, marine ecosystems, and the geology of the seafloor.
#Martha
Export the document to a plain text file.
Place a checkmark on Alex’s script list.
Right-click on the list and select import.

The contents of the list are replaced by the imported text. Hide the list.

Cycling through the conversation
Right-click on the loop and select duplicate.

Place the loop to one side of the current program.

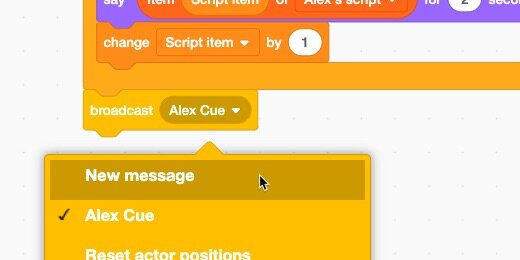
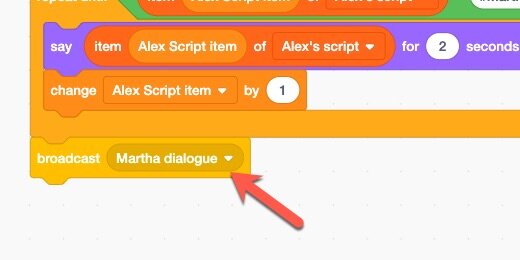
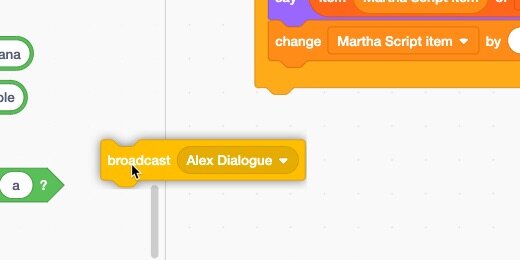
Click the broadcast selector and create a new message.

Set the name to “Martha dialogue”.
Place a [When I receive message] Hat at the beginning of the code. Create a new message.

Use “Alex dialogue” for the message name.

Select the Martha Diver sprite.

Right-click on the loop and select Duplicate.

Place a [When I receive message] Hat on the code. Choose the Martha dialogue message.

Go to the Broadcast block; select the Alex Dialogue message.
Go to the Broadcast block at the end of the first code. Change the message to Alex Dialogue.

What did we just do?
We have code that will allow us to jump back and forth between sprites with dialogue. These blocks of code will take over after the first cue of each sprite.
The Martha Diver sprite will call the Alex dialogue after the Martha cue is done. The code in the Alex Diver sprite will call the Martha Dialogue after it is done.
We don’t have to add any more lines of code to extend the dialogue between these two sprites.
Click the green flag and run through the program.
Everything works fine until It is Alex Diver’s turn to speak. The program seems to stop.
Debugging
The bug is in the loop. Place a checkmark on the Alex Script item variable.

Place a checkmark on Alex’s script list.

Run through the program again. The script stops at item 6. The item on the list at the sixth position is the #Martha cue. The cue is part of the loop instruction to Stop.

The program needs to move to the next line before the loop begins. Right-click the [Change] code block and select duplicate.

Place the code before the loop.

Select the Martha Diver sprite. Perform the same process on the code for this sprite.

Hide the list and the variable. Click the green flag and run through the code again.
More Martha Diver dialogue
We are introducing one more actor. Open the Martha Diver script Google Document. Add the text below to the document. Download it as Plain text and import it into the Martha list.
We have one more person to introduce.
Larry will help round up the animals for the presentation.
Say hello to our guests Larry.
#Larry

Larry has his own set of dialogue. Use the link below to download the actor’s dialogue.
Larry’s script Google Document
More actors
Up until now, the dialogue between two actors has been an easy back and forth. When another actor enters the conversation, we need to make decisions as to which actor will respond. The Script provides the best direction for the conversation.
Disconnect the Broadcast block in the Martha Diver sprite and place it to one side.

Go to the Control section and find an [If…Then…Else] block. Connect it to the end of the code.

If the script cue calls for an actor, we need to make sure the appropriate actor is sent a message. We need a parameter to look for the actor’s cue. We already have that parameter in the Equality operator. Right-click the Equality operator; select duplicate. Make sure you right-click on the Equality operator—the green block— to copy the embedded parameters.

Place the Equality operator inside the condition parameter.

Place the Broadcast code we set aside earlier into the “If” section of the condition.

Go back to the Control section and place an [If…Then] code block into the Else section.

Duplicate the Equality operator and place it into the If parameter.
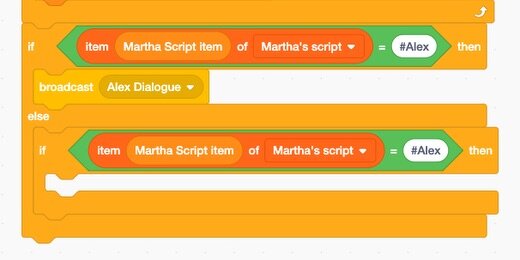
Make a copy of the Broadcast code and place it into the If section.

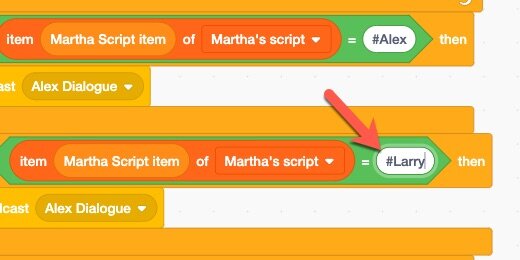
Update the nested If condition. Change the #Alex cue to #Larry.
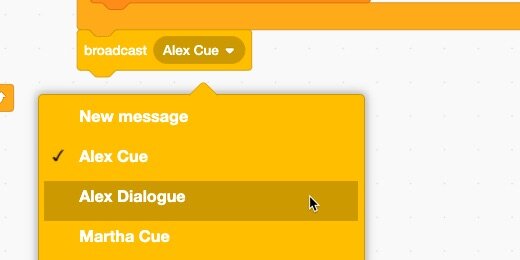
Click the Broadcast selector and create a new message. Set the name of the message to “Larry Dialogue”.
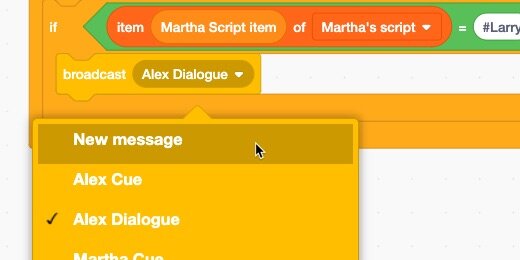
If the script calls for the Alex Diver sprite, the Condition will use the Broadcast code to send the cue to the Alex Diver sprite. If the script calls for the Larry Diver, then it will call the Larry Diver sprite.

We can’t look for just one actor. We need to look for a call to any actor. All actor cues begin with the hashtag. We will use that for our cue to any actor.
Remove the Equality operator from the loop. Place it to one side.

Go to the Operators section. Find the [Contains] operator and place it into the loop parameter.

Remove the [item…of list] from the Equality operator we removed. Place it into the [Contains] operator.

Type the hashtag into the other side of the Contains operator.

The operator looks at the current list item to see if it contains the hashtag symbol. If the line does, the loop exits. Just like it did before when we looked for a specific cue like #Alex or #Martha.
We couldn’t use the Equality operator because it requires that the list item and the value match exactly.
Remove the Equality operator; we don’t need it anymore.

This code needs to be applied to other code blocks that reference dialogue between actors. We are going to update the Martha Cue code.
Remove the Broadcast code.
Right-click the condition block in the code; make a duplicate. Connect the duplicate to the Martha Cue code.

Remove the Equality operator; delete it, we don’t need it.

Duplicate the [Contains] operator. Place the code into the loop.
This updates the Martha sprite. We need to provide the same code for all sprites.
Streamline the cueing process
The condition statement needs to be repeated when an actor needs to say a line. This leads to lots of duplicate code when we add more actors. We should reduce the number of code blocks whenever possible. This is a good opportunity to create a code block to call when needed.
Go to the My Blocks section. Click the Make a Block button.

Set the block name to Dialogue cue.

The Hat block is placed on the canvas.

Get the condition statement from the Martha Cue code and connect it to the Dialogue cue Hat.

Get the Dialogue cue block from the Make a Block section; connect it to the end of the Martha cue code.

Disconnect the condition code from the Martha dialogue code and delete it.

Connect the Dialogue cue code to the end of the Martha dialogue code.

We have a code function that broadcasts a message to the relevant actors. To make this code universal we need to include all the possible actors.
Go to the Control section. Get an [If…Then…Else] code block. Connect it to the Dialogue cue Hat block. The other code will enclose itself within the condition.

Move the nested If condition from the If section to the Else section.

Duplicate the Equality operator. Place it into the main If condition parameter. Change the value from #Alex to #Martha.

Duplicate the Broadcast block. Place the block into the If section; change the message to “Martha dialogue”.

The Martha Diver is not likely to call itself in a code. We are creating a function to call regardless of the actor called in the script.
Updating the other Sprites
This code needs to be part of the other sprites. Grab the Hat code block and drag it to the Sprites section. Release the code over the Alex Diver sprite.

Click the Alex Diver sprite. Check to make sure the code was copied. Arrange the code blocks to see them all on the canvas.

Go to the Alex Dialogue code blocks and remove the [Broadcast] code. Connect a [Dialogue cue] code.

Set the [Equality] operator from the Alex Cue loop to one side.

Place an [Contains] operator into the loop parameter.

Place the [Item] code from the Equality operator into the left side of the [Contains] operator.

Type the hashtag into the right side of the operator. Remove the [Equality] operator from the canvas.

Repeat the process for the Alex Dialogue code.

Now we need to update the Dialogue cue for the parameters in the Alex Diver sprite.
Remove the Martha Script item variable and trash it. Repeat the process for all the Martha Script item variables.

Place the Alex Script item into each Item parameter.

Click the List selector for each Item and select Alex’s script.

Stop and test
We have made several changes and updates to the code. This is a good time to stop and test the program. Make sure everything is working correctly.
You might find that things don’t work correctly. This is part of the coding process. Finding mistakes is difficult and tedious. I don’t like looking for these bugs myself but they are part of the learning process.
Use the Scratch project I shared with you to compare your code.
Introducing Larry
It is time for the last actor, Larry. Select the Fun diver sprite; change the name to Larry.
This sprite will use the same code used by the other sprites. Return to the Martha Diver sprite. Find the Martha Dialogue code. Drag the code over the Larry sprite.

Get the [When I receive message] code and add it to the Larry sprite in the same way.
Hide the Martha Diver sprite. Go to the Larry sprite. Arrange the code blocks on the canvas.
Create a new list for Larry.
Set the list name to Larry script.
Import the plain text file into the list. Don’t hide the list yet.
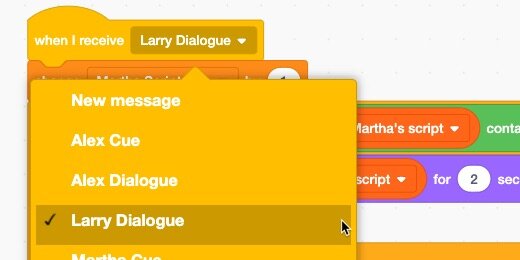
Go to the [When I receive] code and choose the Larry Dialogue message.
We need a variable for the Larry dialogue. Go to the Variables section. Create a new variable; name the variable “Larry script item”. Update the [Change] variable to the “Larry script” item variable.

Replace the “Martha Script item” variable with the “Larry Script item” variable.
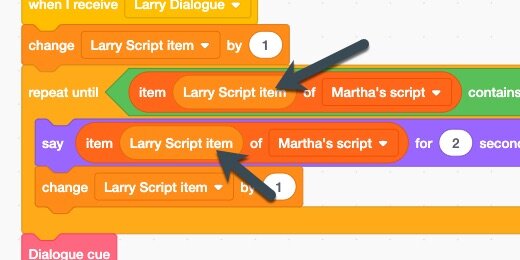
Update the lists to “Larry script”.

Update the Dialogue cue code. Replace the Martha script variables and lists with those for Larry.

Larrys appearance
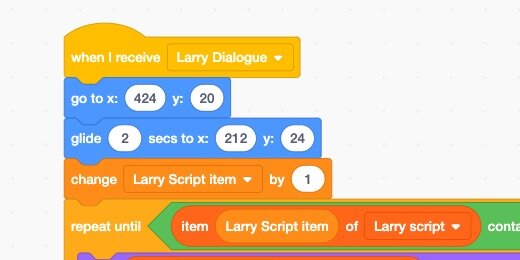
Larry needs to make an appearance. Place a [Go to x:…y:…] code block after the [When I receive message] Hat. Set the values to 424 and 20.

Pace a [Glide…secs to x:…y:…] block after the [Go to x:…y:…] code block. Set the time to 2-seconds. Set the coordinates to 212 and 24.
Place a [Glide…secs to x:…y:…] code block after the loop. Set the glide time to 3-seconds. Set the x and y coordinates to -424 and 24.

Update the reset position code. Set the x and y coordinates to 424 and 24.

Place a [Show] code block after the receive message Hat.

Larry doesn’t have a cue like the other actors. We need to set the list item variable to zero. Get a [Set variable] code block and connect it to the Hide code. Set the value to zero.

Click the green flag and run through the program. Fix any bugs. Use the shared project to check your code.
The final line of the Larry script is just a hashtag. Continue the script process with your own dialogue.