Stories and Interactive projects with Lists

Stories in Scratch are filled with dialogue. In a simple story, the code can stretch down the page and across several code blocks.
In a previous lesson, we created a simple interactive presentation. The presentation included several lines of dialogue and question prompts. You can take a look at that project with the links below. I encourage you to work through that lesson first.
Alex’s Aquarium interactive presentation lesson
The presentation includes ten lines of dialogue and two question prompts. It doesn’t seem like many lines, but this is just the introduction.

In this lesson, we are going to reproduce the presentation using Lists to organize the dialogue and question prompts.
Lists are used to store and organize information for programs. The information is anything we need to reference with our code. Lists are known as Arrays in the field of programming. Arrays do the same thing that lists do in Scratch. Lists in Scratch are an Array.
Lists reduce the length of our code in a variety of ways. Much of it depends on the product you are creating. The original presentation in the lesson uses ten lines of dialogue in the code. The presentation consists of one scene. You can imagine the number of dialogue lines needed in a full story.
The best way to understand lists is to dive right in and use them. Use the link below to download the resources for the project. The resources include a diver sprite and an underwater aquarium scene.
Download the sprite and backdrop
Go to https://scratch.mit.edu and create a new project. Set the title of the project to Alex’s Aquarium Introduction.
Download the project assets using the link above. Click the Add Sprite button and choose the upload Sprite option.

Select the diver sprite and open it to begin the upload process.

We don’t need the Scratch cat sprite. Select the cat Sprite and click the delete button.

Use the Backdrop menu to upload the underwater scene.

Select the underwater scene image.

This is our actor and scene.

Select the Code tab.

Go to the Variables section; click the Make a list button.

Name the list dialogue; click the OK button.

The list is placed on stage with our actor and backdrop. The list is empty and ready for our data.

Click the Plus button to begin adding content to the list.

Type Hello into the first line.

Press the Return key and type —Welcome to Alex’s Aquarium.

The second line stretches beyond the list width. Use the lower right corner to widen the list view.

There is more dialogue but don’t worry –I won’t expect you to write it all out. In Scratch, we have the option to upload a prepared list. The list must be in Plain Text format. I prepared the list for you. Use the link below to download the list.
Plain text lists can be created using any simple word processor. The list below was created in Google Docs. The link exports the document as a plain text file.
I would encourage you to have students write out the dialogue in a word processor and save it as a plain text file.
The text file is a list. Each line of our dialogue is on a separate line. Open the text file and take a look.
Right-click on the list. There are options to import and export list information. Use the import option to get the text file from your computer.

The import process replaces the current list items with those imported.

The first six items are the introduction of the presentation. The next line is a prompt for the visitor to enter their name.
Go to the Events code section; place the When Green Flag clicked code onto the canvas.

Attach a Repeat Until loop from the Control section.

The purpose of the loop is to repeat the contents until we reach a condition. That condition, in our example, is the number of lines in the first part of our dialogue. The first part of the dialogue consists of six lines. The Sixth line prompts for the visitor's name. At this point, we need to break out of the loop and provide the visitor an opportunity to respond.
We need to count the number of lines. For that, we need a variable.
Go to the Variables section. A variable is created for us with each new Scratch project. We need to change the name.

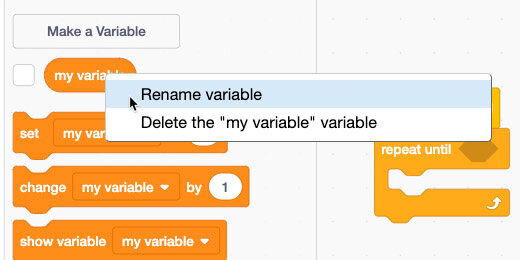
Right-click the variable name; select Rename variable.
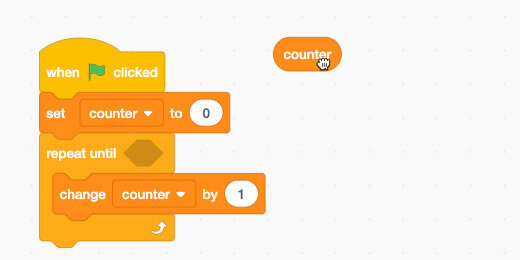
Set the name to Counter.

Place the –Set Variable To– code block between the Green Flag and the Repeat Until loop. This sets the counter at zero each time we begin the program. This is called initiating a variable. It is common practice in coding.

Place the –Change Counter by 1– code inside the loop.

Place the variable block on the canvas. Don’t place it in the code yet.
Place the Equal Operator from the Operator Section inside the –Repeat Until Loop– parameter.

Right-click the Counter variable; select duplicate.

Place the Counter variable inside the left side of the Equal Operator. Change the value on the right to 6.

Place a –Say…for…seconds– block in the loop and below the –change counter by– block.

Go to the Variable section. The list we created includes several code blocks. Find the block that reads –item 1 of dialogue.

Place the code block into the –Say code– parameter.

Duplicate the Counter variable; place it inside the Item parameter.

Find the List block and remove the checkmark. This hides the list box on the stage.

Click the green flag and watch our actor go through the dialogue.

Compare the number of lines used in this code to those I presented at the beginning of the lesson.
Code Explained
This is what we are doing with the code.
Each item in our list is represented by a number. The list begins with number 1. A typical array is indexed and begins with the number 0. Beginning with number 1 makes sense for young coders.
We have a variable called Counter. This counter is used to keep track of our count beginning at zero.
We have a loop that repeats a series of steps until we reach a specific counter value. That value is 6.
The loop contains a Say code block. The Say parameter text is replaced by the item number of our list. The item number is replaced by the counter variable.
The first time through the loop; the counter is incremented by one. The next line displays the contents of the first line of the dialogue list. This is done through the Say code. That line is Hello. It shows the text for 4 seconds and returns to the beginning of the loop.
The loop checks to see if the counter is equal to 6. The counter is now set to the value 1; the loop continues.
The counter is incremented by 1; the counter is now 2. The Say code shows the contents of the second line in the list.
The process repeats until the counter value is 6.
There is no code after the loop ends, so the program stops.
Updating the dialogue
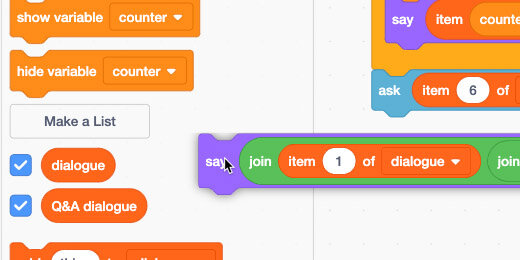
With lists, we don't need to change the code to change the dialogue. Go to the Variables section; place a checkmark next to the dialogue list.

Change the diver's name to anything you like –e.g., your name.

Adding content to lists
Click on item 6; press the Return key. A new line is created to enter more information.

Prompt the visitor to use the keyboard.

We need to update the code to include the extra line of dialogue. Change the count number in the loop from 6 to 7.

Questions and answers
Lists are valuable for dialogue that includes questions and answers. Return to the Variables section. Click the –Make a List– button. It's useful to separate categories of lists with separate lists.

Set the name to Q&A dialogue.

Remove the checkmark from the dialogue list to hide it.

I have some response dialogue ready for the list. Use the link below to download the text file.
Right-click the Q&A list and select the import option. Select the Q&A dialogue text file for import.

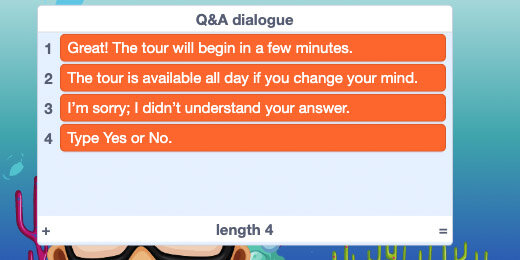
The list contains four responses to questions we are going to ask.
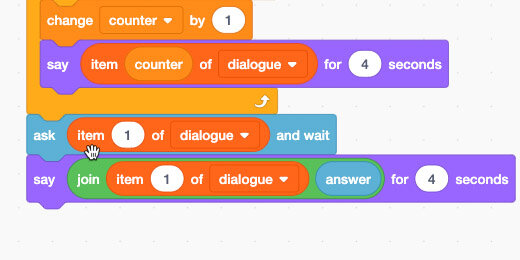
Let’s begin with the first question. Go to the Sensing code block section; place an –Ask…and…wait– block after the loop. Leave the prompt set at What is your name?

Attach a –Say…for– code block to the –Ask– code.

Go to the Operators section. Find the Join block and place it inside the Say parameter.

Go to the Variables section. Place the -item…of…list– block into the left side of the Join operator. Item 1 of the dialogue list contains the word Hello. This is what we want.

Go back to the Sensing section. Find the Answer variable; place it on the right side of the Join code.

The question prompting for the visitor’s name is not on the list Q&A list. Go to the Q&A dialogue list; click the Plus button to add an item.

Enter the question –What is your name?– into line five.
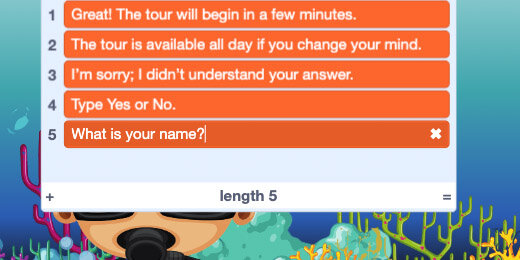
Place the –item…of– block into the Ask code parameter.
Click the List selector; choose the Q&A dialogue list.

Enter the number 5 for the list item.

Go to the Variables section; hide the Q&A dialogue list. Click the Green Flag. Answer the question when prompted.
The words Hello and your name aren’t separated by a space. We will fix that next.

Pull out the Answer variable from the Join operator. Leave it on the canvas.

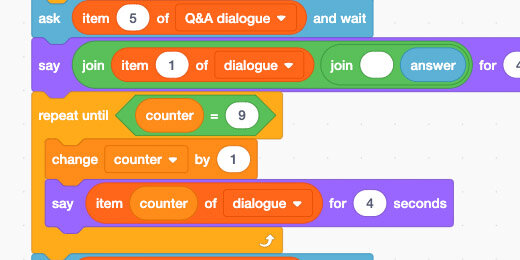
Place a Join operator on the right side of the current Join operator. It seems strange to include two Join operators but this is one way to add space between elements.

Place the Answer variable on the right side of the new Join operator. Erase the contents on the left side and press the space bar once to include a space.

Click the green flag to go through the program again. There should be a space between the word Hello and your name.

We have three lines of dialogue remaining. The lines are in the list from 8 to 10. This is another good use of the Repeat Until loop.
Right-click the Repeat Until loop; select the Duplicate option.

Attach the copy to the bottom of the code.

The copied code includes the last two lines from the previous code. Leave it attached for now.

Change the Repeat Until counter from 7 to 9.
The counter stopped at 7 in the previous loop. The second loop will continue from 7 and add 1. That takes us to the 8th item in the list. The dialogue will loop until it reaches the 9th item.
Questions
We are going to ask a question in the next part. The question is in the main dialogue list. It should be in the Q&A dialogue list.
Place a checkmark on the Q&A dialogue list to have it appear on stage. Add a new line to the list. Enter the question –Would you like to begin?

Select line 10 in the dialogue list; click the X to delete the item.

Go to the Ask block and change the item number from 5 to 6.

We don’t need the last line of code. Drag the code to the Code panel to remove it.
Attach a Repeat Until loop to the code.

Place an OR operator into the loop parameter.

Insert Equal operators inside each of the OR operator parameters.

Place the Answer variable into the left side of each Equal operator. Use Yes for the left equal operator and No for the right equal operator.

This loop prompts the visitor if they want to take the tour. It will repeatedly ask the question until it receives a Yes or No. We went through this in the previous lesson. The link to that lesson is available at the top of this lesson.
Place an If…then…else code block inside the loop.

Place an If…then…else code block within the Else part of the previous condition code.

Place an Equal operator inside each of the If parameters. Place the Answer variable inside the left side of each Equal operator. Compare the answer to Yes in the first comparator and No for the second.

Insert a Say block for each of the If…then…else options. Insert a list item for each parameter of the Say blocks. Select the Q&A dialogue list for each list item. Select items 1, 2, and 3 for each list item.

Add one more Say block after the first in the Else section. Query item 4 from the Q&A dialogue list.

The question needs to be included within the loop. Detach the Ask code.

You need to separate one first then the other.

Place the Ask code before the If…then…else condition. Connect the code blocks to the main code.

Run through the program to make sure everything is working properly. Lists provide lots of versatility. We will use lists more in the coming lessons.