Scratch animation and sound
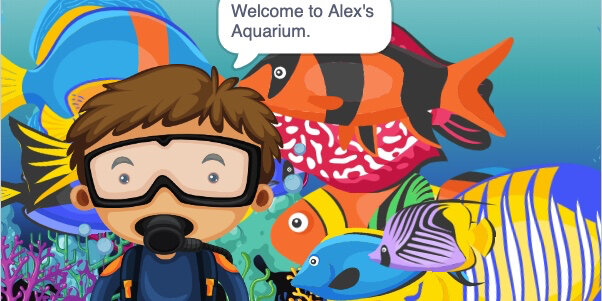
In this lesson, we are adding animation and sound to our aquarium project. The animation for this project includes fish swimming in and out of the scene. It includes animation for the diver as he floats in the tank. We are adding underwater bubble sounds for the project background noise.
You don’t have to be involved in the overall project. This lesson stands on its own. You can include the animation and sound from this project in the overall project later. I will demonstrate how to do that in the final part of the lesson.
Use the link below to get the basic part of the aquarium lesson. The link to the basic project includes basic dialogue and questions.
https://scratch.mit.edu/projects/476015580
Fish Sprites
The project includes the diver and aquarium background. There are three additional sprites. Three fish sprites will be part of our animation. We will add more fish later. The fish sprites are hidden for now. We will use code to reveal and animate them.
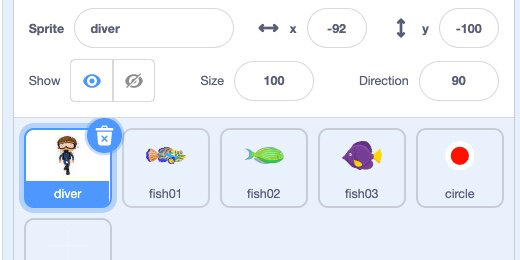
Select the first fish sprite—fish01.

Code, in Scratch, is attached to elements like Sprites and backgrounds. I like this concept because it makes it easier to create lengthy stories with code blocks. If you went through the multiple language lesson, you understand how daunting it can be to deal with lots of code blocks.
The code we develop for sprites applies to those sprites exclusively. For example. the code from the diver applies to that sprite and does not affect the code we are going to develop for this sprite.
Backdrop grid
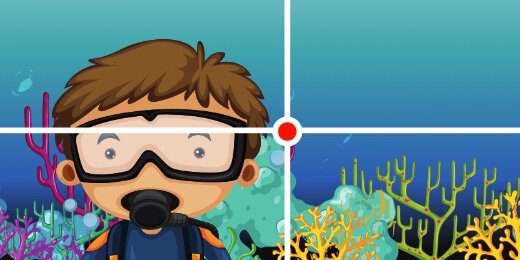
The sprites rest on a backdrop and coordinate plane. This coordinate is much like the coordinate plane used in math. The coordinate plane has an X and Y axis; it has four quadrants.

The measurements in these quadrants are in negative and positive integers. Those measurements are in pixels. The coordinate plane measures 640 by 480 pixels. The center of the coordinate plane is zero. Measurements radiate left and right—up and down.
Let’s take a brief look at how the coordinate system works. Every point in the coordinate system is measured by a pair of numbers. The numbers represent the intersection of the x and y coordinates.
Use the image below. The top right quadrant is the first quadrant. There is a rabbit silhouette sitting at the intersection of 4 pixels to the right and 4 pixels up. There is a duck in the second quadrant. It sites at coordinates -5 and 4. The squirrel silhouette sits at coordinates -6 and -2.

The measurements are both positive and negative. Measurements to the left and down are negative. Measurements to the right and up are positive.
Scratch coordinates
The lesson project has two other sprites. One is called Frame and the other Circle. Select the Frame sprite and click the show button. Select the Circle sprite and click the show button.
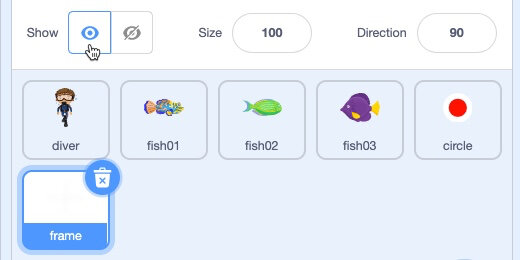
A white coordinate frame appears on the stage. A red circle with a white border appears in the first quadrant.
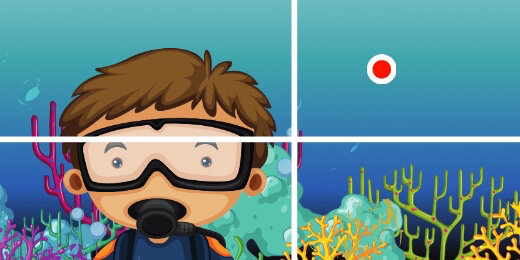
Move the circle around in the first frame. Look in the Sprite setting panel. To the right of the sprite's name is a pair of coordinate numbers. These numbers represent the current location of the sprite. The position is determined from the center of the sprite. Move the circle sprite from quadrant to quadrant. Observe how the coordinate numbers update.
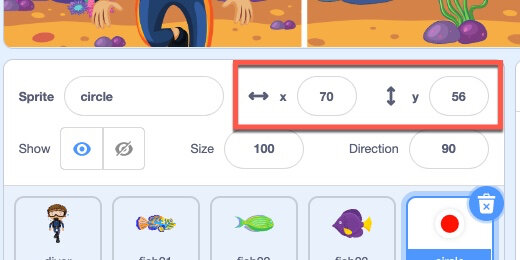
Place the circle in the center. This is the point of origin. The values for x and y are zero.
Sprite limits
Move the circle to the left side. Move it as far left as you can. Sprites cannot be taken off the stage. Some part of a sprite must always be on the state.

Look at the x-coordinate value; mine is at -240. This is as far as I can drag the sprite to the left.
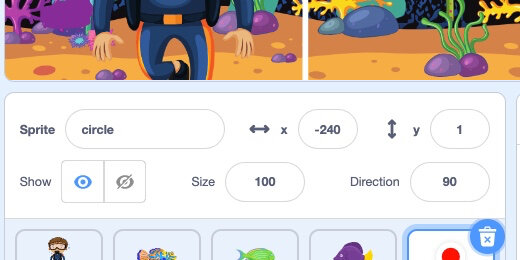
We can try to push the sprite farther to the left by manually entering the x-coordinate value. Type -300 into the x-coordinate field. Press the Return key.

The value will not go beyond -240. Scratch will not allow the Sprite to be manually removed from the stage. This is an important thing to keep in mind as we begin our project.
The canvas measures 640 pixels wide by 480 pixels tall. The actual boundary of the stage is -320 on the left and 320 pixels on the right. The top boundary is 240 pixels and the bottom boundary is -240 pixels.
The x-coordinate of -240 is specific for this sprite to keep some element of the sprite on the stage. The measurement for all sprites is based on the center of the sprite.
Click the hide button to hide the circle sprite. Leave the frame showing for now.

Basic animation
Fish will travel from one end of the aquarium to the other. They will enter the scene on one side and exit on the other. We will begin with the basics and develop more intricate animation as we go along.
We have gone through this coding process in other lessons. We add instructions, one at a time, to develop a full program.
Select the fish01 sprite; click the Show button. The sprite is at the coordinate position (60,60).

Go to the Motion section. Look for the —Go To x… y…— code block. The code block has the same coordinates as the sprite. The code block uses the current coordinate position for the parameters. This is designed to help with the creation of our code.

Move the sprite to the left and off the stage. Drag it as far as it will go.

Place the —go to x…y…— code block on the canvas. This is where we want the fish to begin the motion animation.
The x-coordinate value is far beyond the 320-degree edge of the canvas. This is because the fish sprite is much larger than the circle sprite. The center of the sprite is farther away from the edge of the stage.

Replace the x-coordinate value with -400.

Click the code block to run or execute this block of code.

The code block will try to move the sprite -400 pixels to the left. The settings for the code block place the sprite’s x-coordinate at -379. That’s as far as it will go.
This shows that we can push the sprite far off the stage and Scratch will keep the minimum edge of the sprite on the stage.
We want to begin with the least amount of the sprite showing on the stage. This creates the illusion that the fish is swimming in from an unseen area of the aquarium.
We want the fish to travel to the opposite side of the stage. The opposite side is at the x-coordinate 400. We will use 400 to try and push the sprite from the stage as much as we can.
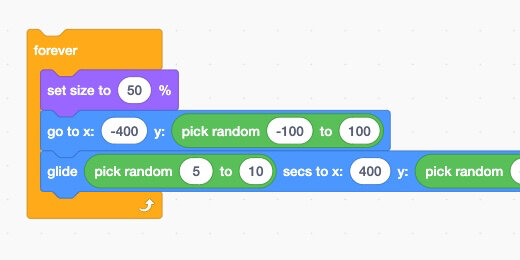
Place a —glide…seconds to x…y…— on the stage and connect it to the bottom of the previous block.

Change the x-coordinate value to 400. Click the first block to run these instructions.

The sprite will dash for the opposite side of the stage. Part of the fin is still visible on the stage.

That is a little too fast. Change the glide seconds parameter to 5-seconds. Click the code blocks to run the instructions.

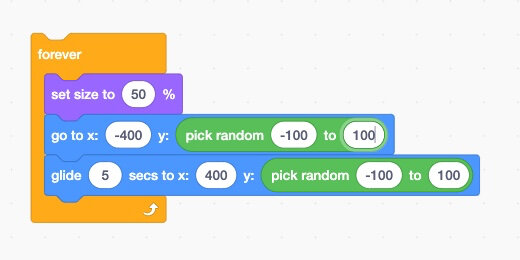
We want the fish to keep swimming in and out of the aquarium window. Go to the Control section; place a Forever loop around the code. Click the Loop to watch the fish move endlessly from left to right. Click the Stop button.

The fish is large. We can keep the fish this large or adjust the size. We are going to adjust the size to create the illusion that some fish are smaller or farther away than others. The same is true to create the illusion for some fish to be closer or larger.
Go to the Looks section. Place the —set size to…— block inside the loop and before the other blocks.

Change the size percentage to 50; run the code to see the effect.
The fish is moving from left to right but it doesn't look natural. Fish don't swim in straight lines. The x-coordinate measures the horizontal left and right. The y-coordinate measures the up and down or vertical distance.
We can change the y-coordinate value but we would wind up with the same problem. The fish would always begin and end in the same location. We need to set a range of exit points for the animation. The points need to be random so the animation doesn’t look like it is cycling through instructions. It is, but we can create the illusion that it is not.
Go to the Operators section. Place the —pick random…to…— block into the glide y-coordinate parameter.

The height of the stage is 480 pixels. The coordinates range from -240 to 240 pixels. The range doesn’t have to be that extreme. Type -100 and 100 into the parameters. Run the instructions and observe what happens.
The random number generator selects a number between -100 and 100. That number is used for the y-coordinate.

The fish will enter from the same location on the left and move to some exit point on the right. That exit point is usually lower than the one from where it started. This is better but it still isn’t very natural looking. The fish needs to enter from random locations on the left too.
Place a —pick random— code block into the y-coordinate parameter for the —go to— code. Set the parameters to -100 and 100. Run the code.
The fish is now entering and exiting at different locations.
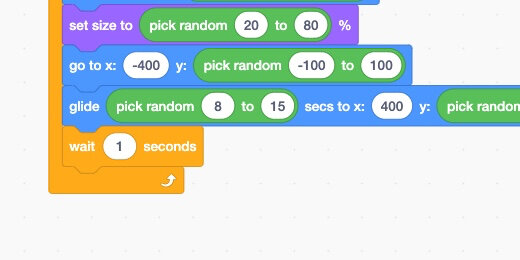
The fish is moving across the stage at a fast pace. The speed needs to be adjusted randomly so it moves slowly sometimes and fast at other times. Place a random block into the glide seconds parameter. Set the range values at 5 and 10 seconds.
Let’s adjust the size of the fish. Fish come in all sizes. Fish also appear larger when they are close than when they are far away. Adjusting the size will give us some of this illusion.
Place a random block into the size parameter. Set the range values to 50 and 70 percent.

The random code block is useful for adding depth and complexity to our three basic code blocks. The range values in the random blocks are my suggestion. Adjust the values to get the results you prefer in the animation.
I didn’t think there was enough variation in the size of the fish. I adjusted the size range values to 20 and 80 percent. I thought the fish was moving too fast. I adjusted the glide range values to 8 and 15 seconds.

The fish keep moving in front of the diver. I prefer they swim behind to minimize the distractions.

Go to the Look section. Place a —go to…layer— block before the Forever loop.
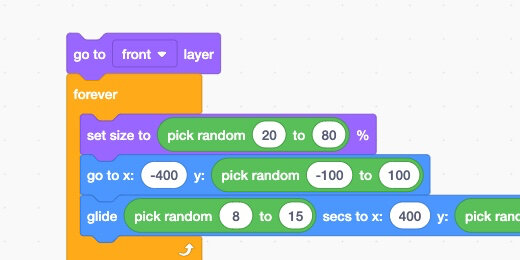
Select the back layer.
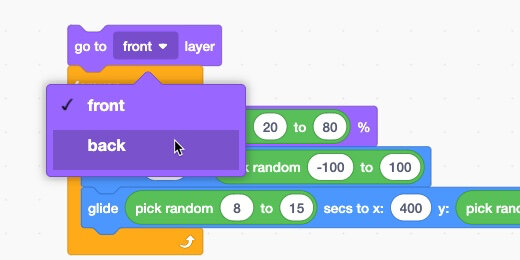
The fish is now swimming behind the diver.

If you have ever been to an aquarium, you know that fish don’t swim perfectly horizontally. They swim at slight angles.
Hide the frame sprite. We don’t need it anymore.
Move the fish sprite so it is near the center of the stage.

Look at the Sprite Setting section. The direction setting for the sprite is at 90-degrees.

Click inside the direction field. Use the dial to rotate the fish to 95 degrees.

The fish is now pointing down and to the right. We don’t need to rotate the angle of the fish too much. Rotating the fish too much might make it look too unnatural.

Rotate the fish in the other direction to 80-degrees.

We want the fish to rotate between these two angles.
Go to the Motion section. Place a —point in direction…— block inside the Forever loop; place it in front of the other blocks.
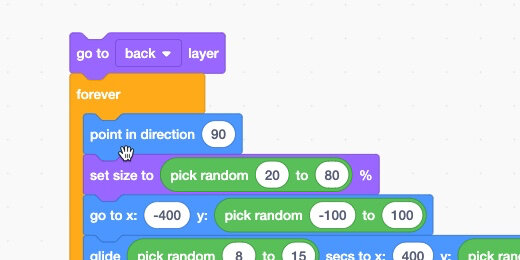
Get a random generator block from the Operators section; place it inside the direction parameter. Set the range to 80 and 95.

Fish in aquariums don't come into view regularly. We need to stagger the interval when the fish appears.
Place a —wait…seconds— block in the Forever loop. Attach it to the end of the blocks inside. We want the fish to move across the window and wait a random amount of time before it reappears.
Place the random generator inside the second's parameter; set the range to 5 and 10 seconds.

Run the program. Everything is working well. We do have an odd thing that needs to be fixed. The fish sprite stops and waits at the edge of the stage.
We need to have the sprite fully disappear from the stage while it waits.

We can’t completely move the sprite off the stage. We can hide it. Place the Hide block from the Looks section before the Wait block.
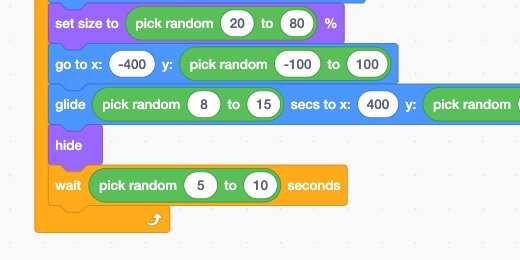
Run the program; you will see this introduces a new bug. The sprite is hidden and does not reappear. Place the Show block at the beginning of the code in the loop.

This is all looking great. One more problem. The fish is always coming in from the left and exiting right. We need fish to enter and exit from both sides.
To solve the problem we need to change the entry and exit x-coordinates. We want to change the values, you guessed it, randomly. We need to randomly select either the left or right side of the stage.

We need an —If…then…Else— code block. The code needs to compare a value to make a decision.
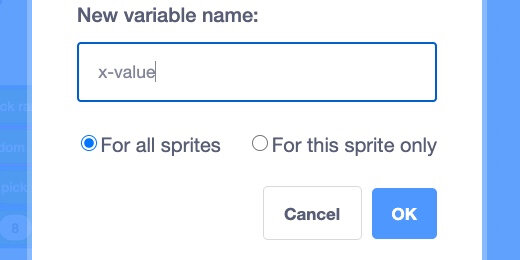
We need to create a variable to store the decision and pass it to the relevant code.
Go to the Variables section; click the Make a Variable button.

Set the variable name to x-value; click the OK button.
The variable is created and selected. The checkmark causes the variable to display the contents on the stage. Leave it on for now.

Place the variable in an empty area on the canvas. Place a Set variable on the canvas too.

Go to the Control section. Place an —If…Then…Else— code block between the Show code and the rest of the code. You might need to move blocks out of the loop to accommodate the condition statement.

Place an Equality operator from the Operators section into the condition parameter.

Place the random number picker into the left side of the Equality operator.
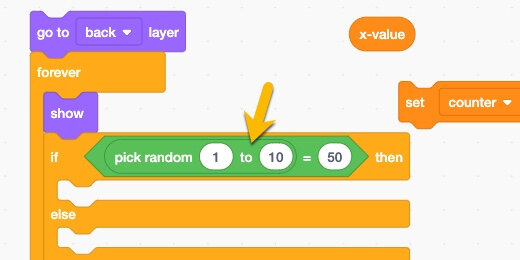
Set the random number generator range from 1 to 2; we only need one of two possible choices. Set the comparison value to 1.

Place the Set variable block inside the If section. Set the variable to the x-value variable.

If the selected number is 1, we want to enter from the left. Set the variable to -400.

If the selected number is 2, we want to enter from the right. Right-click on the Set variable block; select Duplicate.
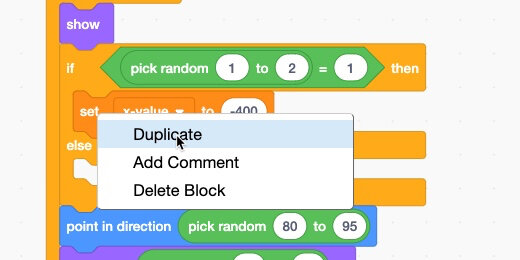
Place the duplicate inside the Else section. Set the value to a positive 400.

Right-click the x-value variable; make a duplicate.

Place the duplicate variable into the —go to x…— parameter.
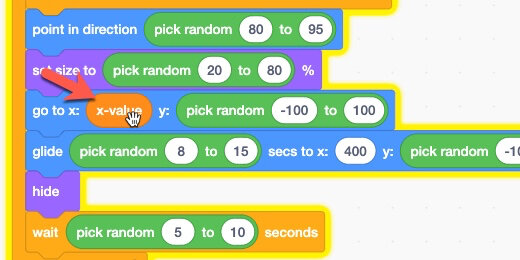
The value for the other side needs to be the opposite value. For example, if the beginning x-coordinate value is 400, the end x-coordinate value for the glide needs to be -400. The same is true if the value is -400; the exit value needs to be a positive 400.
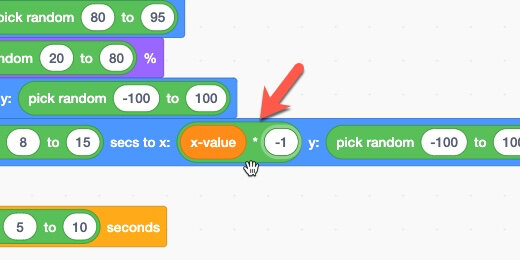
We can easily do this with math. We will use the Negative Property of Multiplication.
Place a multiplication operator into the glide x-coordinate parameter.

Place the x-value variable into the left side of the operation; type -1 into the right side.
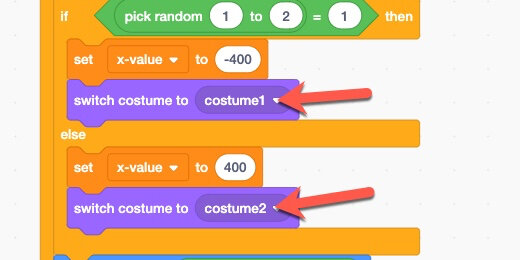
Run the program. Everything is working nicely, but the fish swimming backward when it enters from the right. There's a clownfish in every class. Sorry, bad joke.

We are going to take care of this with a costume change.
Click the Costumes tab.

The sprite has only one costume. We are going to make one in a few clicks. Right-click on the costume; select duplicate.

This costume will face in the opposite direction; click the Flip Horizontal button. That’s it.

Click the Code tab. Go to the Looks section. Add a —Switch costume to…— code block after each Set variable block.

Set the first Switch costume block to Costume1; set the other to Costume2.
Run the program. The fish is entering from one side or the other. It is swimming across to the opposite side. It is facing the correct direction. Just about everything with the animation has some random aspect.
More fish to the animation
That is all we are going to do for this animation. Connect the Green Hat block from the Events section to the beginning of the code.

We need to apply the same animation code to the other sprites. Drag the Green Flag Hat block down to the Sprites section. Place it over the fish02 sprite and release.

Select the fish02 sprite. Look at the coding canvas. The code was copied to this sprite. Click the green flag. Watch the animation of two fish on the stage.

Stop the program. Drag the code from this sprite to the fish03 sprite. Watch three fish swimming in the aquarium with the diver.

Let’s add more fish to the aquarium. Use the link below and download several fish sprites. The sprites are in a Zip folder.
Download Zip file
(The fish images are courtesy of freepik.com)
Go to the Sprites section; hover over the Add Sprite button and choose the Upload option.

Select all the Sprites; click the Open button.

The sprites are added to your Sprite library. The sprites are hidden until we begin the program.
Select one of the sprites. Look at the coding canvas. The sprite has the code we created in the lesson. I did this to save you time. Now you can enjoy an aquarium filled with fish. Click the Green Flag; enjoy.
Diver animation
The diver is very still. It’s time we added animation to our diver.
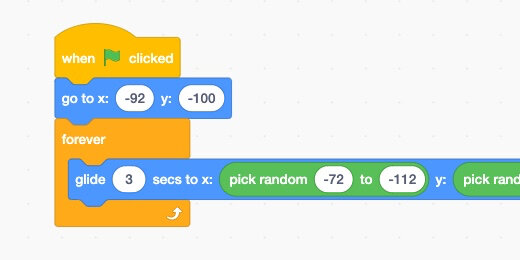
Select the diver sprite. Place a —go to x…y…— block on the coding canvas. The diver is at position (-92,-100). We want the diver to remain in the general area. The diver doesn't need to be swimming around. The diver needs to look like he is floating in the water.

Place a —glide to x…y…— block on the canvas. Don't connect it to the previous block.

The diver needs to move around the starting position in random motions. Place a Random number generator into each of the glide parameters.

We don't want the diver to stray too far away. The starting x-coordinate is -92. We will allow the diver to stray up to 20 pixels from this location. We need a range for the random number generator in the x-coordinate. Enter -72 for the lower range and -112 for the upper range.

Enter -80 and -120 into the y-coordinate random number generator range.

Get a Forever loop and place the Glide code into the loop. Connect the —Go to— code to the loop. Placing the Go to code outside the loop centers the diver at the beginning.

Click the code and observe the diver moving from side to side.
The diver is moving too fast. Set the glide duration to 3-seconds. Connect the Green Flag Hat to the code.
I have an animated Gif for you below.
Bubble sounds
The diver is underwater. We should hear some underwater sounds coming from the aquarium. Select the Sounds tab.

Hover over the Add Sound menu; select the Choose a Sound option.

Type bubbles into the search box; click the Bubbles sound.

Click the Play button to listen to the bubbling sound.

I like the sound. I would like to modify the sound so it sounds like bubbles coming from deep underwater.
Click the Slower button four times. Note how the sound is deeper. This is closer to the sound of bubbles underwater. The settings are automatically saved.

Click the Code tab.
Place a —Start Sound— code block inside the Forever loop of the animation. Place the block at the beginning of the loop. Make sure the Bubbles sound is selected.

Click the green flag to run the program.
This lesson is complete. We have animated fish in the aquarium. The diver is animated. Bubble sounds are coming from the aquarium.
Sharing code
This is part of a much larger project. Programmers often create smaller parts of a larger program. The parts are assembled into the larger program.
This larger project includes multiple languages. It’s easy to integrate the code we created into the larger project. The code is part of each sprite.
Go to the Sprites section; select a sprite. Right-click the sprite; select the export option. This downloads the sprite to your computer. Repeat the process for each fish you want to include in the larger project.
Switch to the larger project and upload the sprites. It works just like the sprites I shared with you for import earlier.

The divers sound is a little different. Exporting the diver will export all the extra code. We don’t need this code in the larger project.
We will create a temporary sprite to hold the diver animation and sound.
Go to the Create Sprite button and select the Paint option.

Set the name of the sprite to “diver float and sound”.
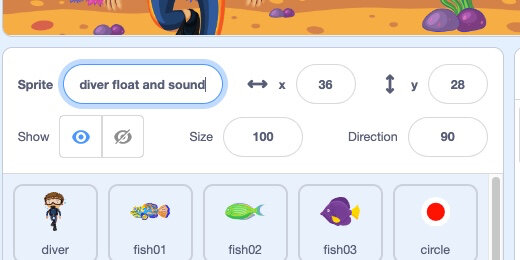
Select the Code tab. Select the diver sprite. Find the sprite we created. Don’t click on the sprite. Make sure you can see it in the Sprite section.
Drag the diver's motion and sound code. Take it and drop it onto the sprite. Click the diver float and sound sprite. Make sure the code is part of the sprite. Export this sprite to your computer.

Open the larger project; select the diver float and sound sprite. Make sure the diver sprite is visible. Drag and drop the code onto the diver sprite.

The code is added to the existing diver code.

Look at the animation below to see how the new code is integrated into the larger project.
Right-click the diver float and sound sprite; select delete.
Please take the time to answer the quick survey below. Thank you.