Micro:bit light sensor basics

Micro:bit light sensor
The Micro:bit has LEDs that emit light. The same LEDs are used to collect and measure light. The LEDs on the Micro:bit perform double duty.
In this lesson, we are going to:
1. Learn to measure the light received by the sensor.
2. Set the brightness of the Micro:bit LEDs based on the ambient light.
3. Turn the LEDs On or Off based on the ambient light.
You don’t need to have a Micro:bit to learn about the Micro:bit. Microsoft provides a free online Micro:bit simulator. No login account is required. Use the link below to access the simulator.
The simulator is also the environment we use to create code for the Micro:bit.
Use the link to go to the Make Code website. Click the New Project button.

Use “light sensor project” for the name and click the Create button.

Each new project includes two code blocks. The [on start] code runs instructions the moment the Micro:bit is turned on or restarted. The [forever] loop runs code in the loop for as long as the Micro:bit is powered.

A BIT of information
A bit is the smallest container of information. A bit holds a maximum of two values, either 1 or 0. These represent programmings states like yes, no, on, off, true or false. The states are translated into information. The combination of possible states is expressed as an exponent. Eight bits is 2 to the power of 8 or 256 bits of information. The number of bits here is exactly what the Micro:bit uses to represent the amount of light received by the sensors. The Micro:bit detects light with the LED sensors. The light is processed and the intensity of the light is converted to a number range. That range is 0 to 255.
Measuring light
Go to the Basic code blocks section. Find the [show information] code block.

Place the code block into the [forever] loop.

Go to the Input section; find the [light level] code block.

Place the code into the [show number] parameter.

Look over at the simulator. A simulated light meter is placed at the top left corner. The LEDs on the Micro:bit scroll to display the light reading. The light reading is also represented below the light meter. That reading is 128. This number represents the midpoint of the possible light received by the sensors.

Use the mouse arrow to change the light level. Click inside the meter and move the pointer up. This reduces the light intensity. I reduced the light intensity to 98 in my example. Drag the meter down to increase the light intensity.

Dimming
Let’s use the sensor as a dimmer. A dimmer reduces or increases the light based on sensor input.
Remove the [show number] block and set it to one side.

Go to the Basic section; get a [show icon] code block and place it in the loop.

Go to the LED section and into the More section. Find the [set brightness] code block.

Place the code into the loop and below the [show icon] code block.

Get a [light level] code block from the Input section and place it into the [set brightness] parameter.

Go over to the simulator. Move the light input meter up and down. Watch the icon increase and decrease in brightness.

The brightness of the LEDs is proportional to the light level received from the sensor. The sensor provides graduated information to the program. The program uses this information to brighten or dim the LEDs accordingly.
On/Off sensor
The sensor can be used as a simple switch. We need to use conditions to decide when to turn the LEDs On or Off. We want the LEDs to turn on when the light level on the meter is below a certain value. We can choose any value.
Remove the [set brightness] block from the loop and set it to one side.

Go to the Logic section and find the [if True then] code block.
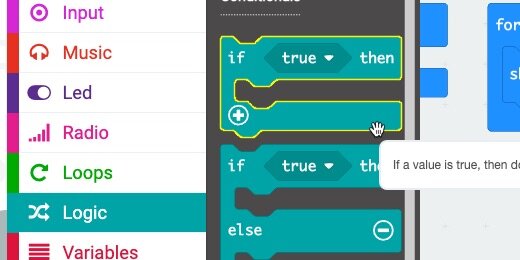
Place the condition statement inside the loop and below the [show icon] code.

The condition statement looks for a condition to be True.
We want the condition statement to look at the light level information. If the value from the meter is less than a certain value, we the LEDs to turn on. If the value is greater than a certain value we want to turn the LEDs Off. We can choose any value to trigger the switch.
We need a way to store this value and pass it into the condition and parameters later. The value will be stored in a Variable.
Go to the Variables section and click the "Make a Variable" button.

Set the name of the variable to “light trigger” and click the OK button.

Variable code blocks are created. Get the [set variable to…] code block.

Place the code block into the [on start] section. You might need to move the code blocks around.

Enter 100 into the variable parameter. This assigns 100 to the variable. The value is assigned when the Micro:bit turns on or is restarted.
This is our value to turn the LEDs On or Off.

Go to the Logic section and into the Comparison blocks. Look for the [less than] cod block.
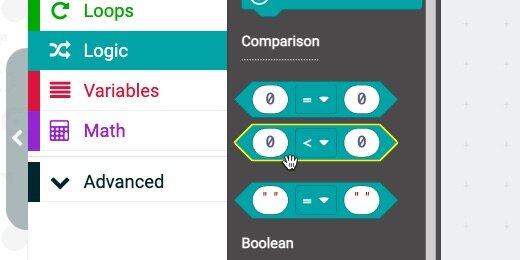
Place the code block into the condition parameter.

Get the [light trigger] variable and place it into the right side of the [less than] parameter.

Get the [light level] input and place it into the left side of the [less than] parameter.

Get the [set brightness] code block we set aside earlier and place it into the condition statement.
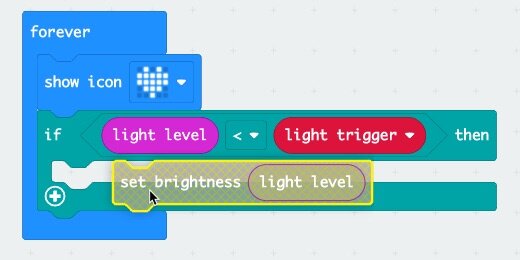
Remove the [light level] code from the [set brightness] parameter.

Take the code to the Codes section to remove it from the coding area.

If the light level is less than the light trigger, 100, we want the LEDs to turn On. The brightness value is already set at 255. This is the maximum brightness. This takes care of turning the LEDs On.

We need to follow the same process for turning the LEDs Off. The process is just reversed. The condition statement turns the LEDs Off when the light level is greater than the light trigger.
Right-click on the condition statement; select the duplicate option.
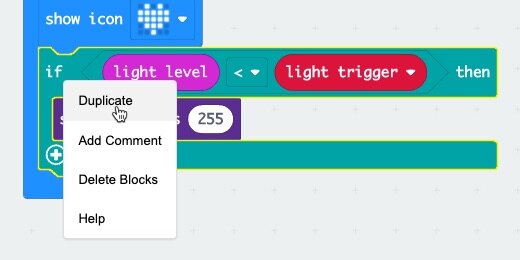
Place the duplicate below the first condition statement.

Click the comparator selector; choose the greater than comparator option.

Change the brightness level to 0.

Move the light sensor meter to a value less than 100; the icon lights to full brightness.

Move the meter to a value greater than 100; the icon turns off.

The light trigger might be too high or low. Change the value in the light trigger variable to 50 or 150. Choose a value of your own.
